updated Aug 21, 2026
Do you have a question not covered in the FAQ? Feel free to submit your question via the Ask a Question form and a DE support member will contact you in a timely manner.
Browse the FAQs below or try out the SRJC Faculty Banner Q&A bot.
The Bear Cub Hub Training and Support Options
Watch the recording of our 8/11 training. It is 50 minutes long and covers all the basic faculty tasks in the Bear Cub Hub.
This self-paced training will walk you through the basics of the Cub Hub: login, navigation, accessing rosters, sending class emails, how waitlists work, how to add/drop, census, and submitting grades. Enroll Here.
PDA BCH PowerPoint
Click on the link above to access the PowerPoint presentation from the Aug.14 PDA Session 1 for the BCH fundamentals to get you up and running to start the semester.
Zoom drop-In hours
Bring us your questions on Zoom, 10-11 am and 3-4 pm Tuesday, Wednesday, Thursday.
Location: Zoom Appointment Link.
- How do I access the Bear Cub Hub?
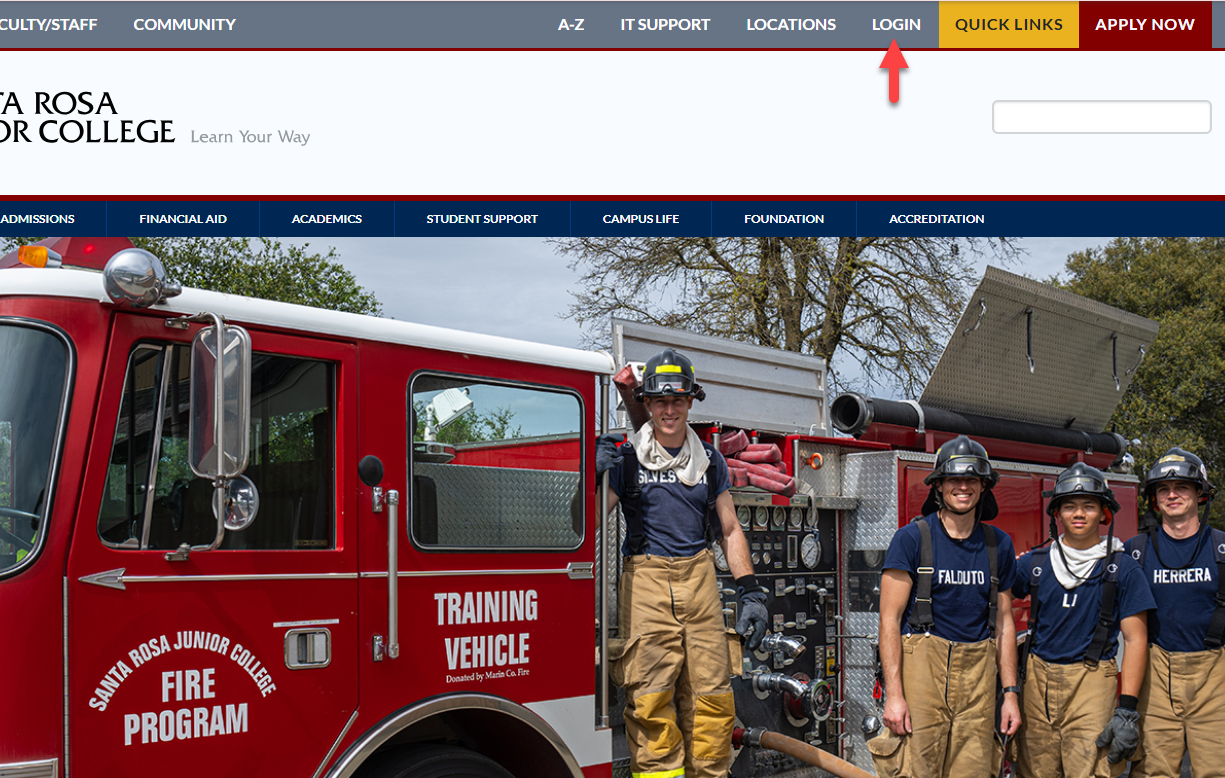
Go to the SRJC homepage. Go the the "LOGIN" text and hover over the word.
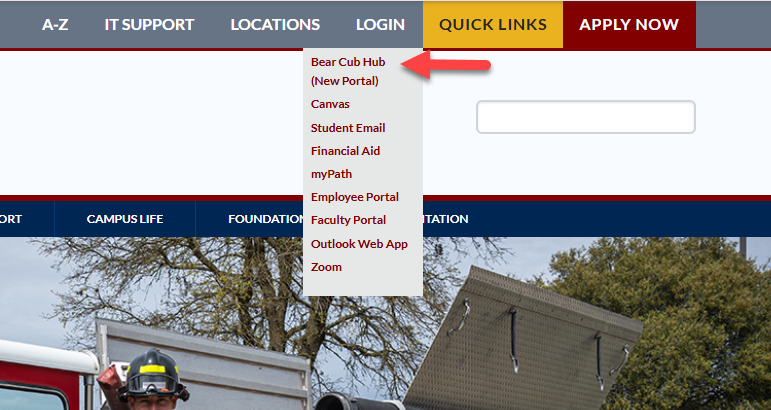
Move down and select "Bear Cub Hub" from the menu.
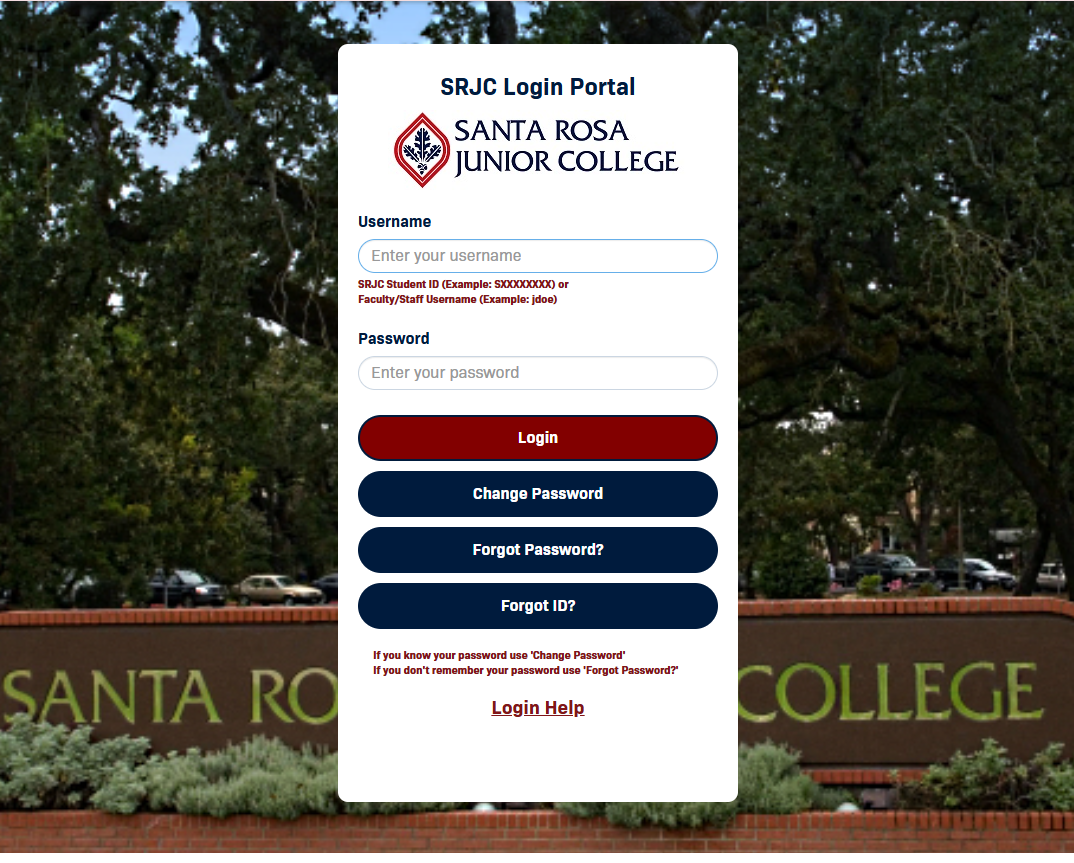
Use your existing Single Sign-On (SSO) credentials. You do not need to reset your password.
You can go to the Bear Cub Hub Login Page and log into the portal using your credentials.
- Why do students have different login instructions than employees?
Students currently use their Student ID # to access all applications at SRJC. Now that we have transitioned to a new SIS and related database all Student ID #s have changed. In contrast, employees currently authenticate with their SRJC username associated with their @santarosa.edu email, which is not impacted by the migration to Banner.
- Will Canvas login for Faculty change?
No. Faculty will continue to use their SRJC username to authenticate into Canvas.
- What are “cards” in Bear Cub Hub?
Cards are the main way to access tools and services. Each card corresponds to a specific function, such as registration, grades, or faculty tools.
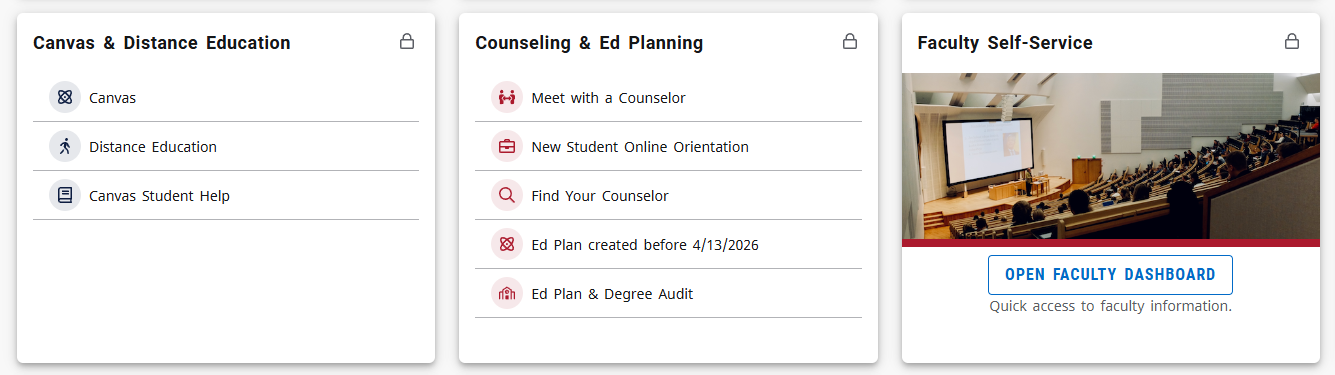
- Why do my Bear Cub Hub cards look different from someone else’s?
Cards are personalized based on your role (student, faculty, staff). Some cards may appear in different places or be required (locked) depending on your access.
- Why can’t I access certain features yet?
Some features may not be available until services (such as registration) are open or system updates are complete.
- Can I use Bear Cub Hub on my phone or tablet?
Yes. Bear Cub Hub adjusts to your screen size and will display cards in a vertical layout on mobile devices.
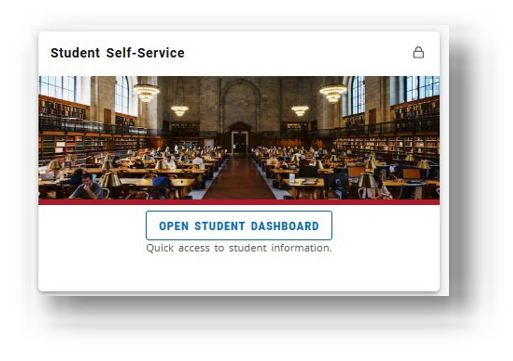
- What does the lock icon on a card mean?
A lock icon means the card is required for your role and cannot be removed from your home page
- How do I add or remove cards from my home page?
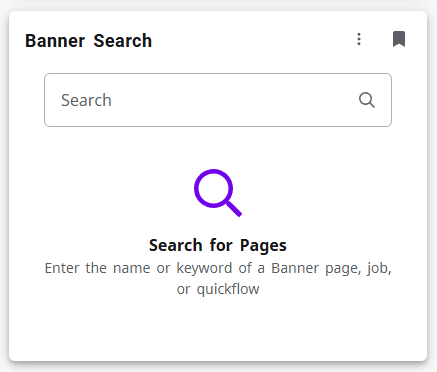
Use the flag icon on a card to add or remove it from your home page. In the picture below, the Banner Search card has been flagged or added as a "favorite" and will appear on the Bear Cub Hub home page.

You can also select “View All Cards” to browse available options.
- What is the menu icon (three lines) in the top corner?
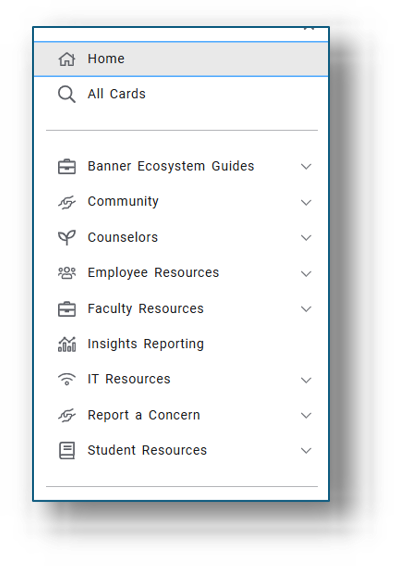
This menu provides a list of links and resources. The options you see will depend on your role at SRJC. This is sometimes called a "hambuger" icon.
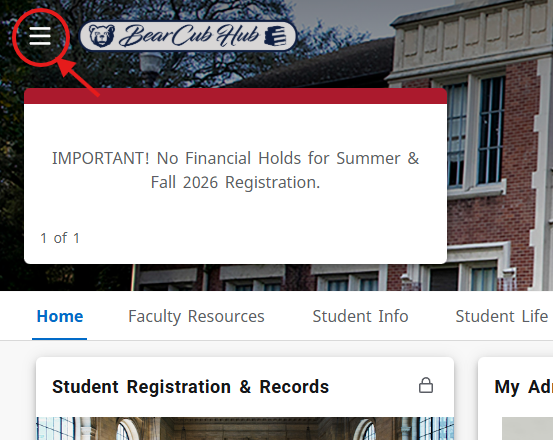
Here is an example of what a menu might look like when the icon is selected.
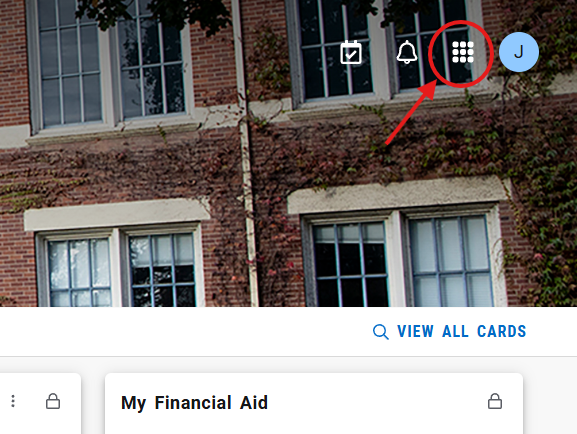
- What is the “waffle” icon?
The waffle icon opens additional applications available to you. Not all users will have access to every application.
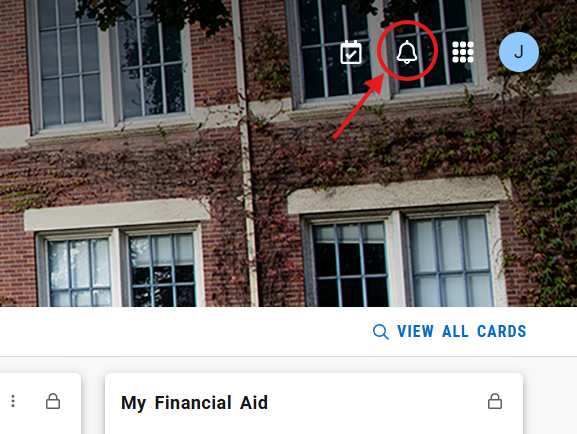
- What are notifications and tasks?
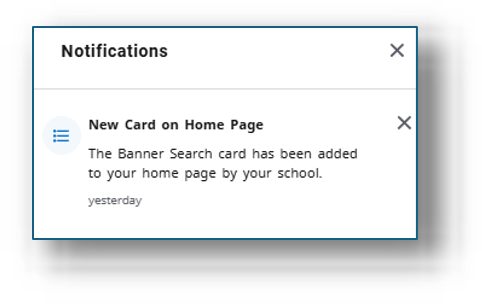
Notifications share updates. The notification icon is an icon of a bell and can be found in the corner of the Bear Cub Hub landing page.
Pictured below is an example of Notifications faculty may receive.
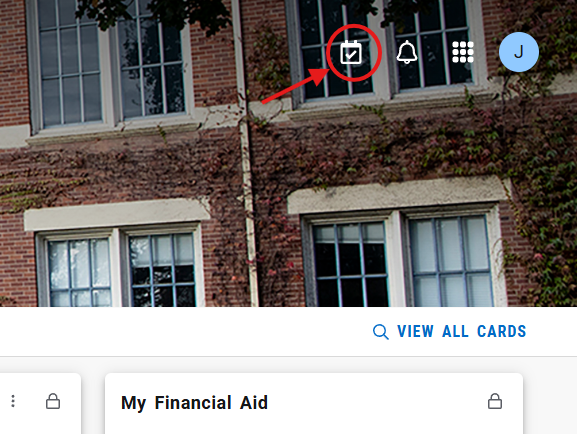
Tasks highlight items that may require action and may include a number indicator. The task icon is a calendar icon that is located in the corner of the Banner landing page, next to the notifications icon.
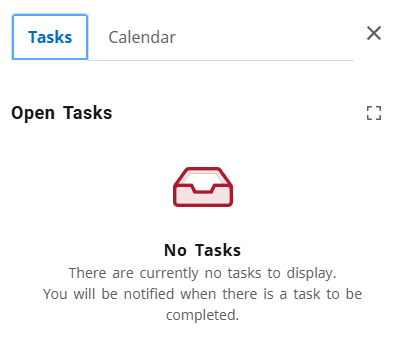
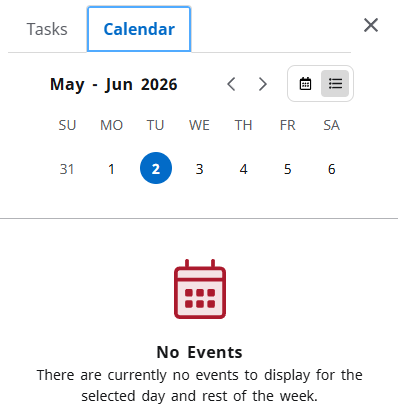
Pictured below is an example of the sample tasks and calendar options.
- How do I get back to the main page?
Select the Bear Cub Hub logo at the top of the screen to return to the home page at any time.

- Where can I find my classes and rosters?
- To find your classes and rosters, locate the Faculty Self-Service Card on the landing page after you log into the Bear Cub Hub.
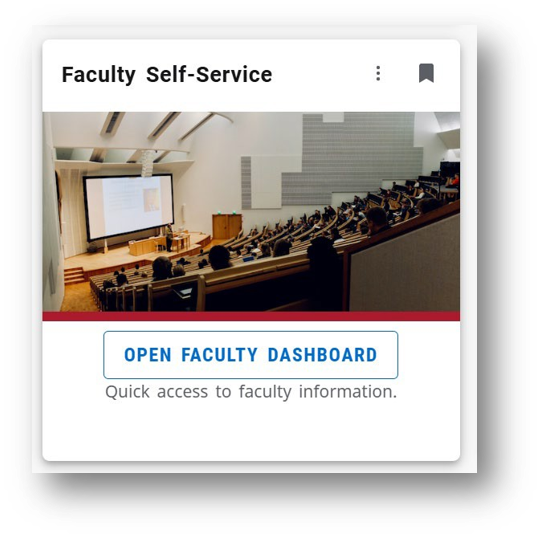
- To access the Faculty Dashboard, click on the card.
- Once you've accessed the dashboard, click on "Class List & Waitlist / Student Emails"
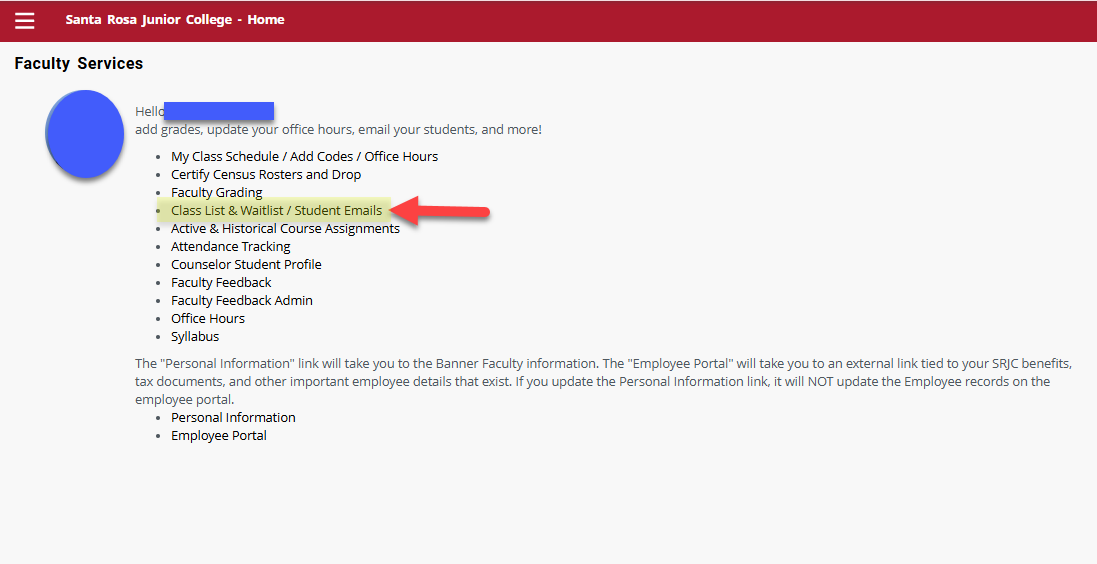
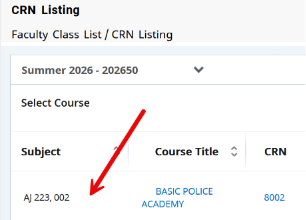
4. Your classes will be listed. To access the class roster, click on the course under the "Subject" column.
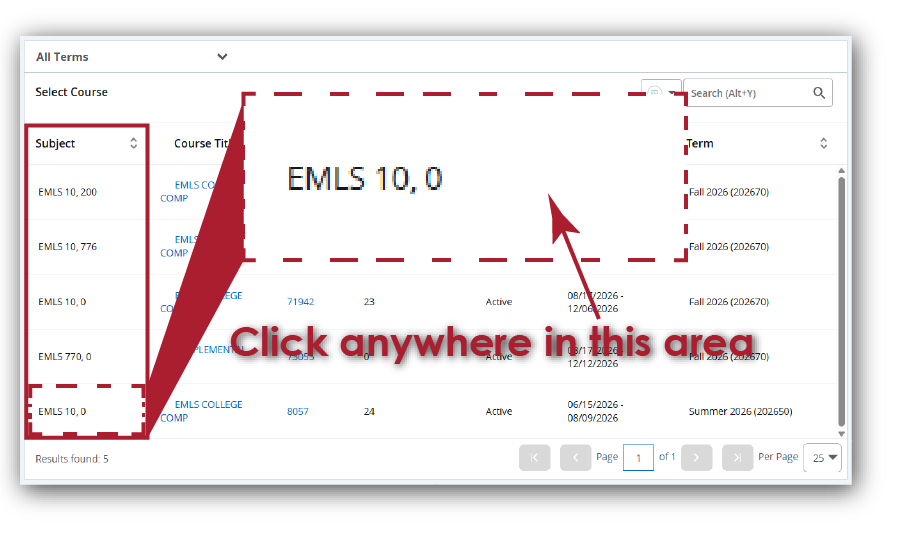
5. After clicking on the class, the roster of students enrolled in the class will appear.
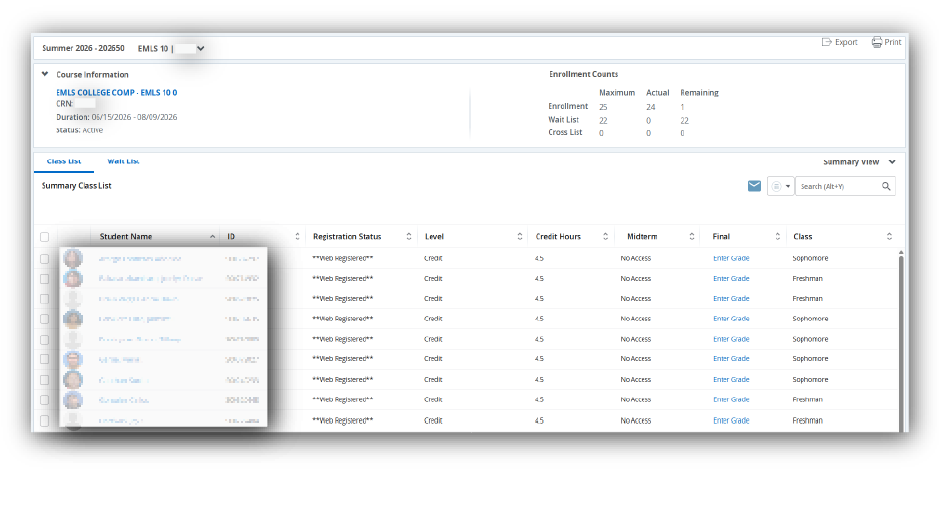
6. Choose to view the class lists (enrolled) or the waitlist (not enrolled).
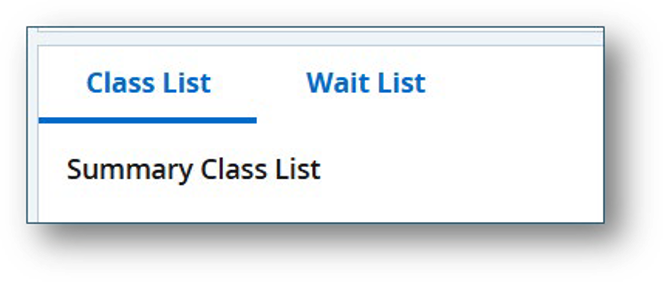
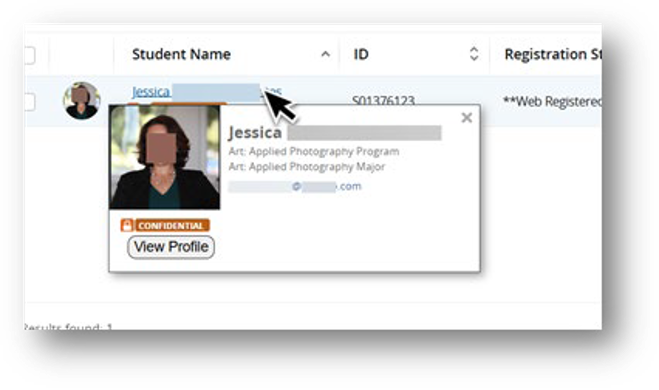
7. If a student has a picture on file, you can hover your cursor over their name, and a pop-up window will appear with their picture.
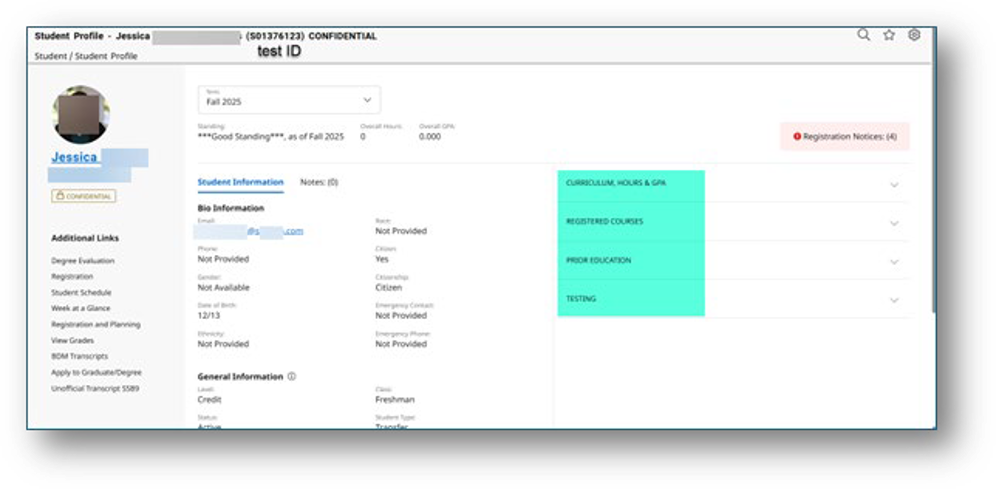
8. If you click on their hyperlinked name, it will open their student profile in a new web browser. The green-highlighted drop-down items are visible to faculty.
Note: Confidential Status:
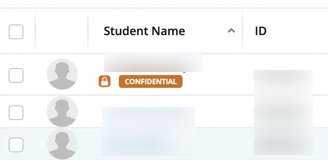
A "confidential" indicator next to a student's name in the class list indicates they elected to keep their directory information private. You can find more information at the FERPA Resources Page.
Confidential status means that the student's data should not be shared to 3rd parties like parents or employers because the student said not to release directory information. It doesn't mean that you can't share the student's information with another college employee for legitimate educational purposes (ex. you need to talk to an A&R employee about a student's record).- To find your classes and rosters, locate the Faculty Self-Service Card on the landing page after you log into the Bear Cub Hub.
- How do I print or export my rosters?
The Bear Cub Hub does not offer the same options for printing and exporting rosters as the old system did. Currently, faculty cannnot print or export a roster that includes the students emails until after the Census rosters become available, and faculty cannot control in detail what the print-out or export includes. Requests for changes to these functions have already been made.
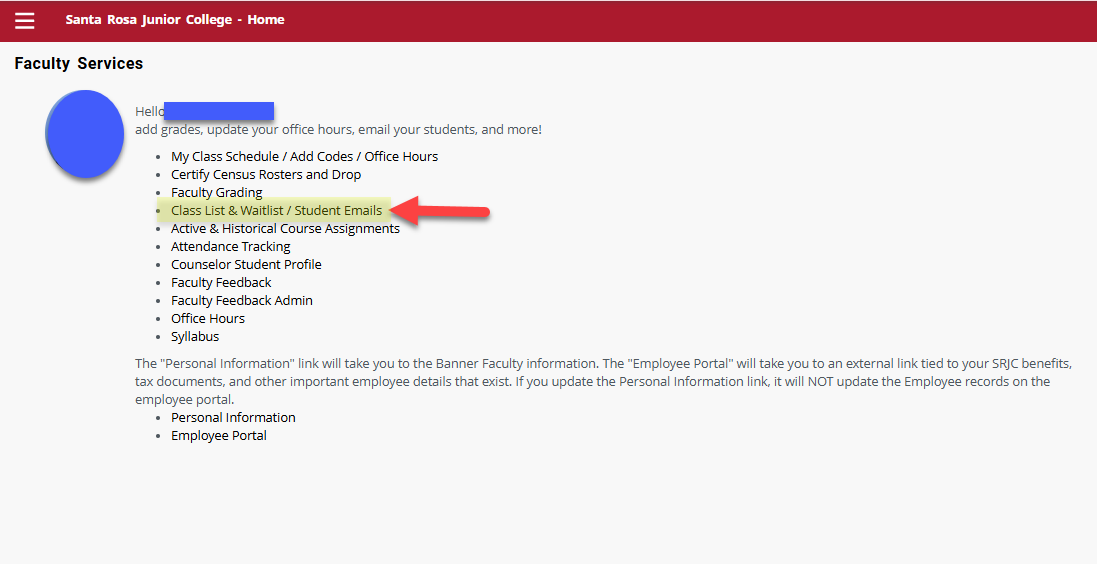
1.To print or export a roster, go to your Faculty Dashboard, then select Class List & Waitlist / Student Emails:
 2. Next, you will see list of your current classes. Click anywhere on the row of the class you would like to print or export. Do not click on the blue links.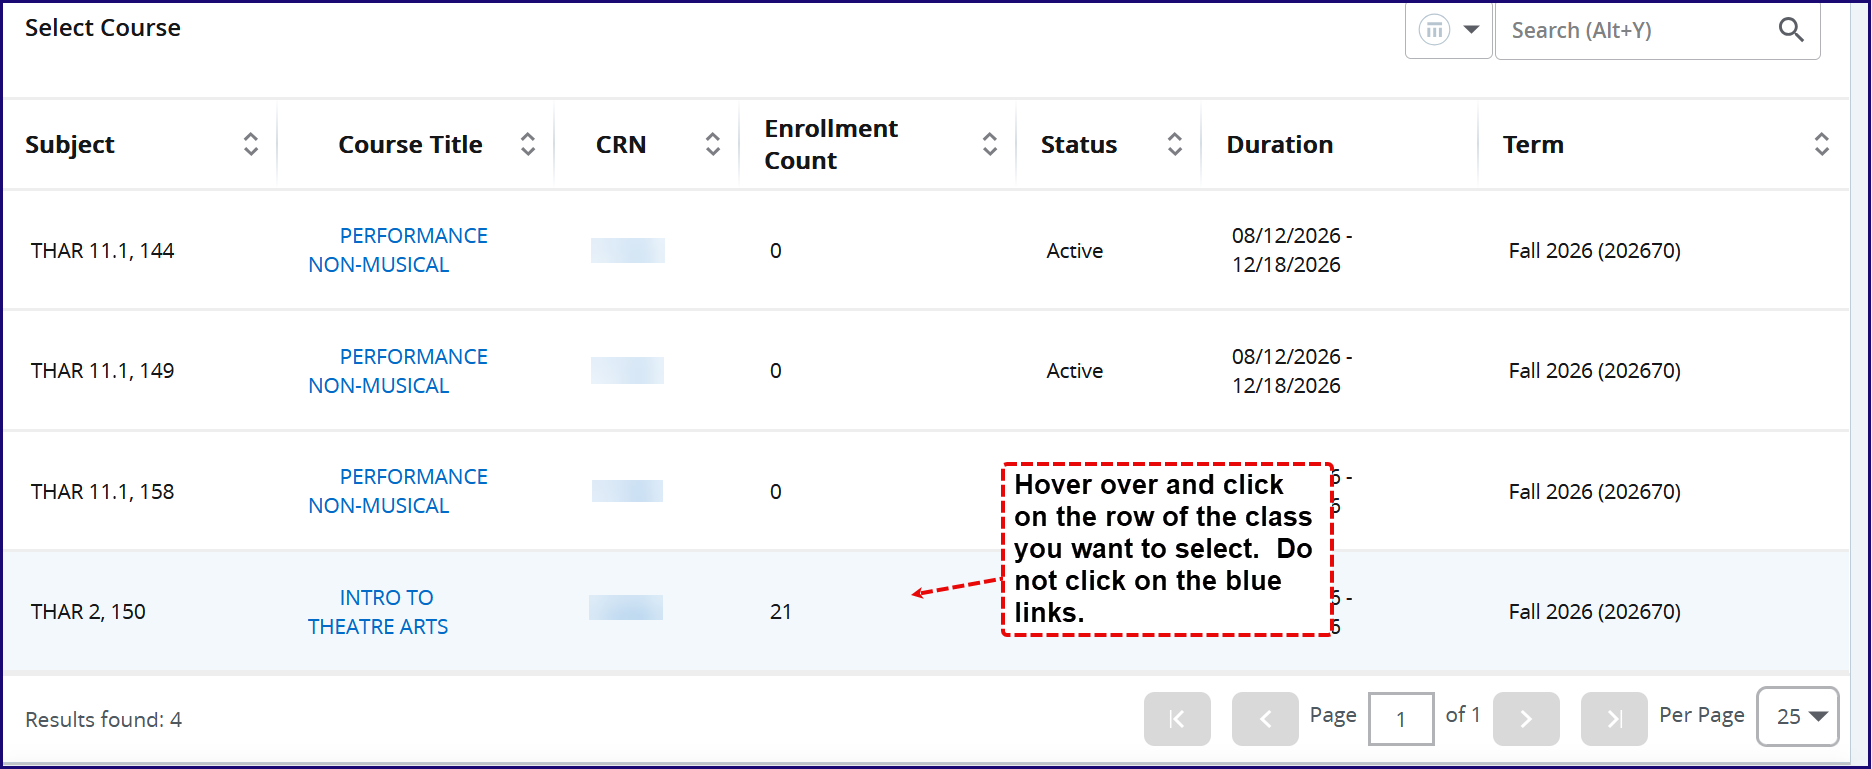
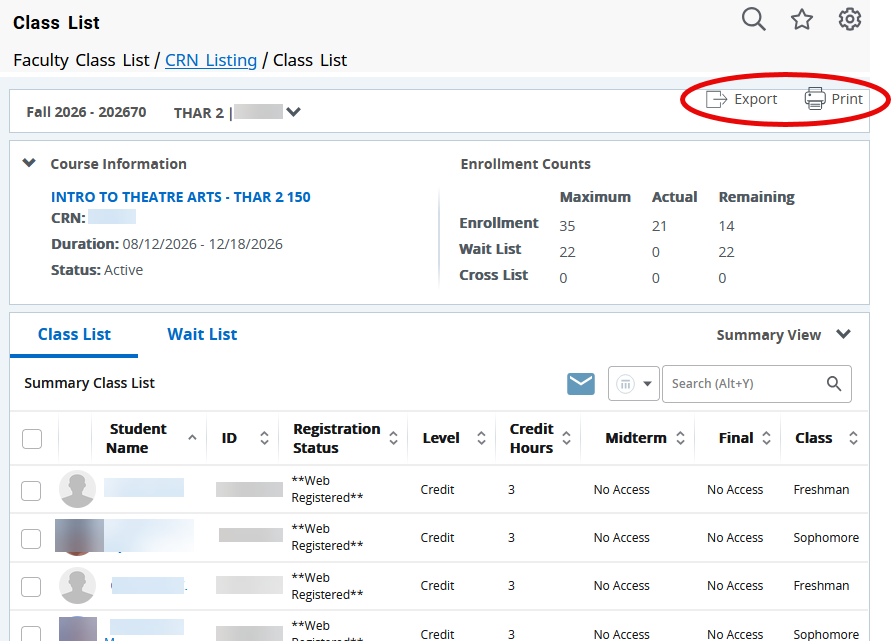
3. You will see the course's details and your roster below. Locate the Export or Print buttons in the top-right of the screen.
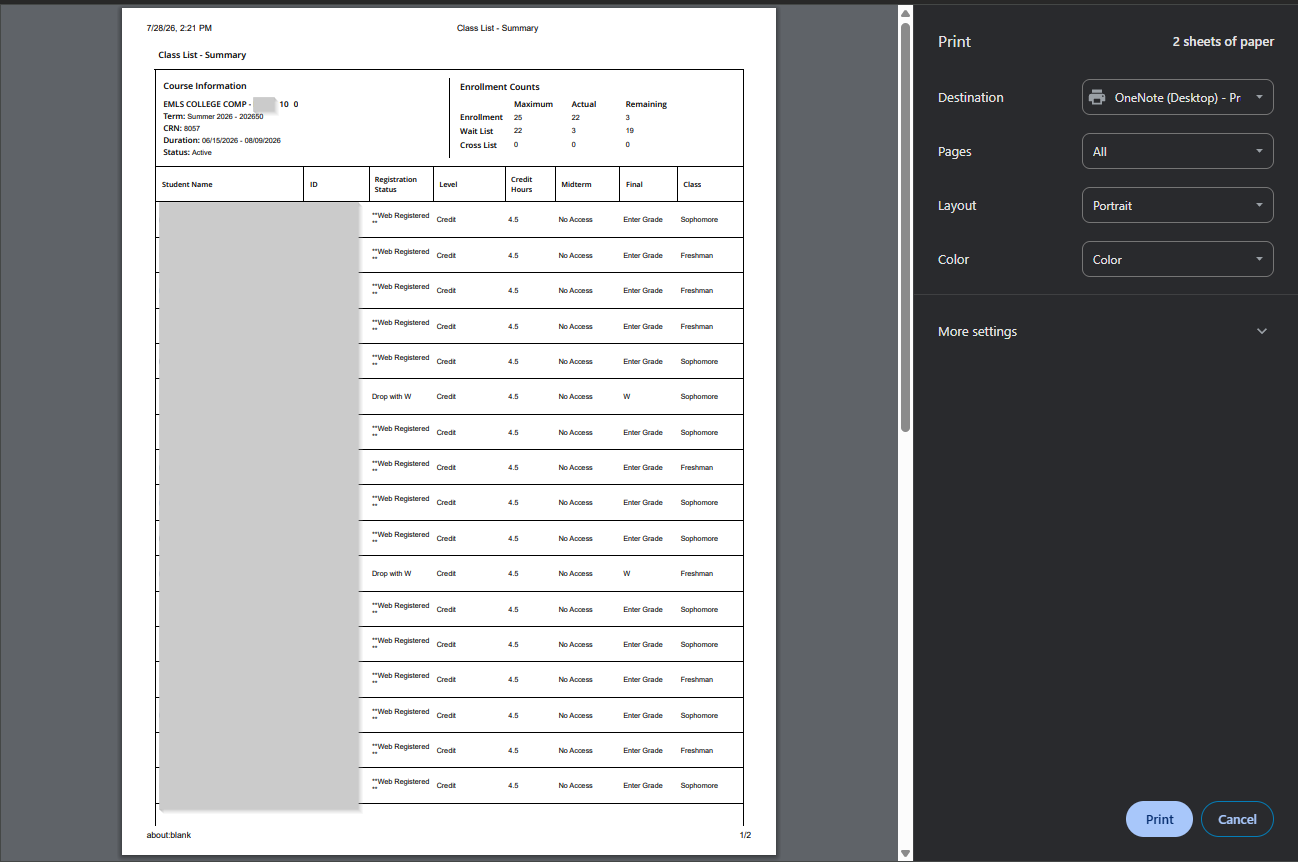
4. If you select Export, a pop-up will allow you to select an xls or xlxs Excel file type. The file will be downloaded to your Downloads files area. If you select Print, the print pop-up box will appear, where you can select your print options.
- What if I don't want to use my computer's email app to email students?
Some instructors may not want to use their computer's default email app to email students in Bear Cub Hub for various reasons. If that is the case, you can use the web-based version of Outlook to email students.
This is the only known option to work around to avoid using your computer's email app. Please be understand that this option causes all email links in the browser to default to the Outlook mail app.
CHROME- Go to
chrome://settings/handlersdirectly or open Settings from the three-dot menu. - Select Privacy and security on the left.
- Click Site settings.
- Expand Additional permissions and click Protocol handlers.
- Choose Sites can ask to handle protocols.
- Clear or remove any blocked or old email services listed under the blocked section.
- Open your new webmail tab (like Gmail or Outlook).
Click the double-diamond handler icon on the right side of the address bar and choose Allow. This is an image of the handler icon: This icon will be located in your Chrome address bar.
LINK TO SITE SOURCE FOR THE ABOVE INSTRUCTIONS
FIREFOX
- Click the menu button (three horizontal lines) and select Settings.
- Scroll down to the Applications section on the General panel.
- Type
mailtointo the search bar. - Click the drop-down menu next to mailto and select Outlook (or your newly added web application)
LINK TO SITE SOURCE FOR THE ABOVE INSTRUCTIONS
Firefox doesn't detect the Outlook webapp in its initial options on the Settings page. So, if you sign into the webapp, you should get a prompt to add Outlook webapp to the list of programs for the mailto option.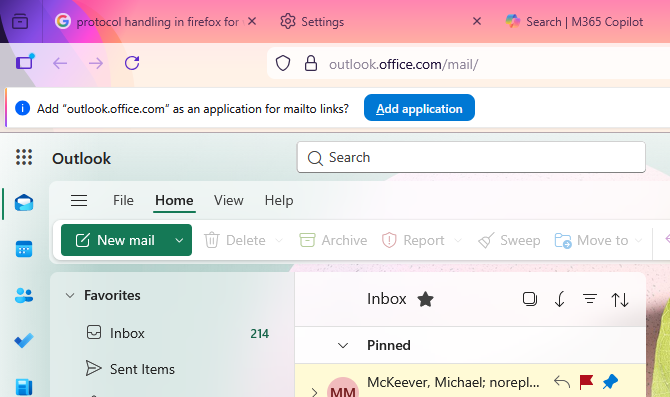
MICROSOFT EDGE
First Step: Enable Protocol Handler Registration in Edge
- Open Settings in Edge.
- Go to Cookies and site permissions (or Privacy, search, and services > Cookies in newer versions).
- Scroll down and turn on Allow sites to ask to become default handlers for protocols.
Second Step: Register Your Webmail as a Protocol Handler
- Sign in to your webmail account (e.g., Gmail, Outlook.com) in Edge.
- Reload the page. You should see a diamond icon (two overlapping diamonds) in the address bar.
Image of diamond icon:
- Click it and choose Allow to register the site as a mailto handler.
LINK TO SITE SOURCE FOR THE ABOVE INSTRUCTIONS
APPLE SAFARI
Safari does not support web-based protocol handlers natively. Unlike Chrome or Firefox, Safari cannot directly register a website like Outlook Web (OWA) to handle
mailto:links.To makemailto:links open in Safari and automatically navigate to the Outlook Web composition page, you must use a third-party extension or route the request through the macOS default email settings.Option 1: Use a Safari Extension (Recommended)This is the cleanest method to force email links clicked inside Safari to open directly in Outlook Web.- Open the App Store on your Mac and search for a mail redirect extension like MailtoUI or Mailto-Web.
- Install the extension and open Safari.
- In the Mac menu bar, click Safari > Settings (or Preferences).
- Click the Extensions tab and check the box next to your new extension to enable it.
- Click on the extension's configuration options and select Outlook or paste the custom Outlook Web compose URL:
https://office.com(orhttps://outlook.live.com/for personal accounts).
Option 2: Switch to an Alternative BrowserIf you regularly rely on web-based protocol handlers, switching your workflow to a browser with native handler support simplifies the process significantly.- Chrome, Edge, and Firefox all have Mac versions of their browsers in the Apple App Store.
- Go to
- How do I email my students?
- From the Faculty Dashboard, click Class List.
- Select the Term.
- Click the blank area to the right of the course number.
- Choose to view the Class List (enrolled) or the Wait List (not enrolled).
- Select which students you want to email using the left check boxes (the top check box selects all students), then select the blue envelope icon above and to the right of the student list.
- Once you select the envelope, a new email will open in the default email application you have configured on your computer. It may default to sending the email from your personal email address rather than your SRJC email address. This can be confirmed in the “From” line of the email that opens. If your personal email appears there, see the instructions below for help in setting your SRJC email (Outlook) as the default email program on your computer.
- If you select 2 or more students, their addresses will be placed in the BCC line.
- Click the Send button to send your email.
*Tip: For help with changing your computer's default email address, see this guide for Mac users or this guide for Windows users or contact the IT Help Desk any time between 8am-5pm.
Alternatively, you can message your currently enrolled students via the Canvas Inbox. You must publish the relevant Canvas course before the system will allow you to message your students.
- Is there a limit to how many students I can email at one time via the Cub Hub?
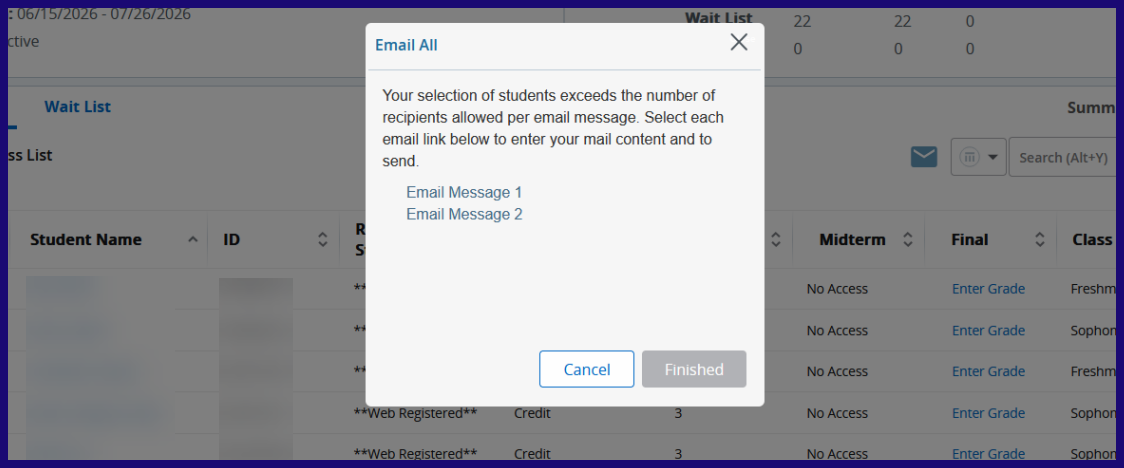
Yes. The limit depends on which email system you are using. If you are using Outlook, the maximum number is 62. The system will prompt you to send 2 or more emails if your class has more than 62 students enrolled. Below is a screenshot of this message.
- How can I view waitlists and how do waitlists work in BCH?
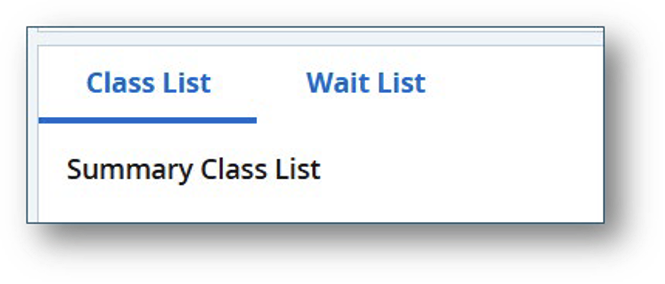
Waitlists for a course can be viewed from the Class List & Waitlist / Student Emails page. When viewing the class list, click on the the tab titled "Wait List" on the Class List page.
Students on the waitlist are not registered for the class, and the system does not automatically register them when a seat opens. The system sends them an email telling them that a seat has opened and that they have 24-hours to register, and provides registration instructions. The system will stop sending these emails 24-hours before the first day of the class (as listed in the schedule). After that point, students would need to use an Authorization (Add) Code to enroll in the class (see information below).
Waitlists - before the class begins:
When a class is full, a student can add themselves to the waitlist. When someone drops the class and there is an open seat, the system automatically emails the student at the top of the waitlist informing them that they have 24 hours to register for the class. If that student does not register within that time window, the system continues down the waitlist. If the student misses that 24-hour window, they have to start the process over again, adding themselves to the bottom of the waitlist. The system sends the last of these emails 24 hours before the class start date listed in the schedule.
When a waitlisted student is in their 24-hour window, they should navigate to their registration Summary area (where the class will already be listed) and use the Action menu to select “Register” then click Submit. Note:
• If they attempt to add the class by clicking “add” in the schedule of classes when that CRN is already in their Summary, they will receive an error message that it is a duplicate course.
• If a student on the waitlist is attempting to add on/after the course start date, the process is slightly different. They will need to Drop from the (inactive) wait list first, then select Register on the Action menu of the course in the Summary.
• If the student is already registered in a different CRN of the same course but on the waitlist for a preferred CRN, they will have to drop the other CRN to register for the preferred one. In this case, it’s advisable to use the “Conditional Add and Drop” checkbox so the current CRN will not be dropped unless the preferred CRN is successfully added.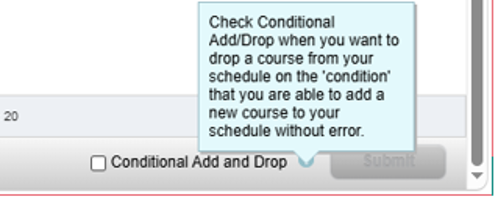
Waitlists - after the class begins:
On the first day of class, the waitlist’s automatic process is halted but the list is still viewable by instructors. Instructors can view the waitlist and send authorization (add) codes to students. Students then need to drop themselves from the waitlist and use the authorization code to register for the class.
- How do I use the authorization (add) codes?
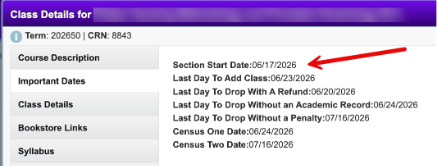
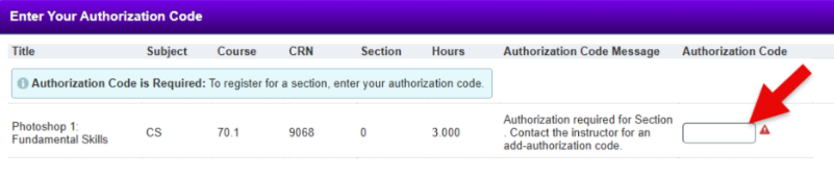
Authorization codes (previously called add codes) are generated 1 week before classes begin. Authorizations (Add) codes can be used by students to register starting the first day of class until the day before the Census date. These dates for your particular section can be found by clicking on your section number (CRN) and selecting Important Dates from the left-side menu. .
How to access and use authorization codes (instructor):
- From the Faculty Dashboard, select My Class Schedule / Add Codes / Office Hours.
- Select the term and CRN (course section number),
- Scroll down to the bottom of the page where you will see the Authorization Codes list.
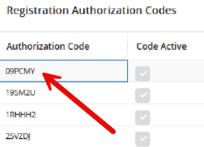
- Send or give an authorization code to your student. To send students codes in BCH check out the FAQ section How do I email my students in BCH. Note that the gray checkmarks do not indicate the status of the code – faculty can provide a code with a gray checkmark.
- The “Code Active” checkmarks will remain gray, even after a code is successfully used, but the information related to the student who used each code will populate in the list.
Note: you may consider distributing authorization codes in the order that students appear on your waitlist.
- How do students use authorization (add) codes?
This section is to help you better understand how students utilize authorization codes/add codes. This information is available in the Student FAQ for Bear Cub Hub.
- From the Student Dashboard, select Browse, Plan and Register for Courses.
- Select Register for Classes.
- Select the Term and click Continue.
- If you are already on the course waitlist, remove yourself by selecting Drop in the Summary area and click Submit. Then use the Action menu for that course (still in the Summary area) to select Register.
- If you are not on the course waitlist, earch for the course you want to add via the Subject or CRN number. Click Add next to the course you want to register for.
- A pop-up window will appear. Type the authorization code your instructor has given you into the Authorization Code area and click Confirm.
- Click Submit in the Summary area.
- Your Summary will now show you as registered for the class.
- Finally, pay your fees: Start by returning to the Home area of Cub Hub.
- Click View Student Account on the My Student Account Card.
- Follow the prompts to pay your fees.
If authorization codes are not working
It’s possible that your course has a later start date, in which case students would not be able to use the authorization codes until that date. You can confirm the start date in Class Details:
- How do I view dropped students?
At this time, there isn't a way to view all dropped students in Bear Cub Hub. Students who have dropped your course or been dropped by you can be viewed in your Canvas course (even if you're not using Canvas), check either the People page where you will see dropped students like this:

Or the Gradebook where you can see dropped students this way:
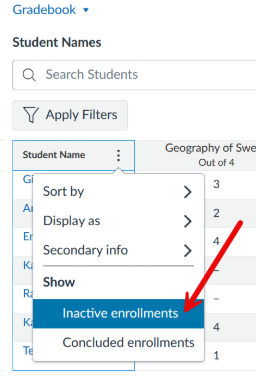
You can also check out this video about how to drop students in Bear Cub Hub that Tara Jacobson created.
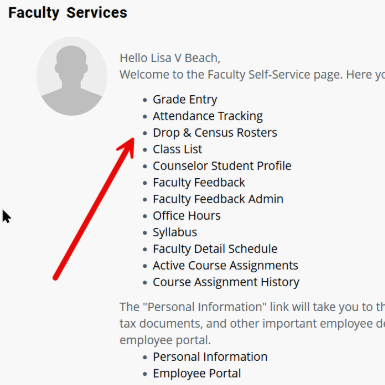
Drop with W
Only students who "Drop with W" show in Bear Cub Hub for faculty to view. These students are found in the Class List along with currently registered students for the course. Such students are given the status of "Drop with W" under the column called Registration Status.
Students who "Drop with W" are counted in the "Actual" total under Enrollment Counts. They also appear in the class email list generated from the Email function. They can be removed from emails by not selecting the check box next to their names in Class List, or by manually deleting their addresses from the BCC area when emailing.
- How do I drop no-shows?
Log into Bear Cub Hub and access the Faculty Self-Service Dashboard. Select "Drop & Census Rosters"
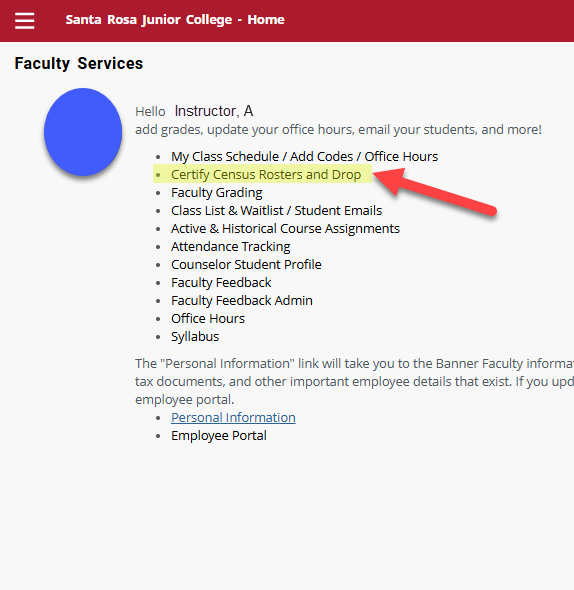
Click on Current Drop Roster Summary.
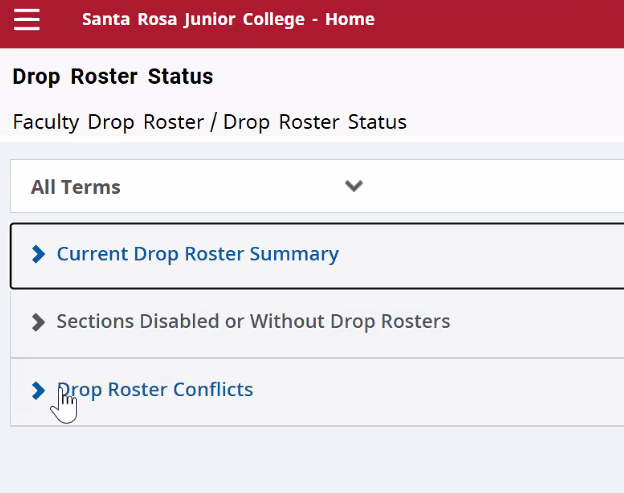
This part is not intuitive, you have to click on the white space, not hyperlinks.
Toggle to the action drop down menu.
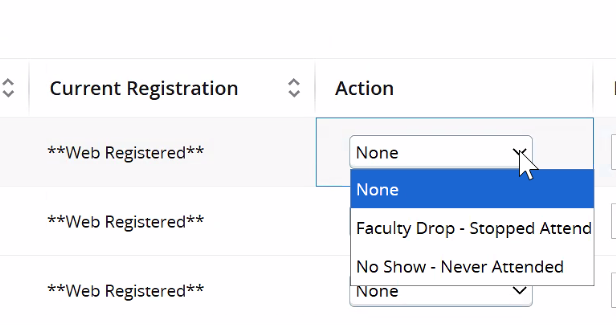
Scroll down and click submit. You’re not done yet.
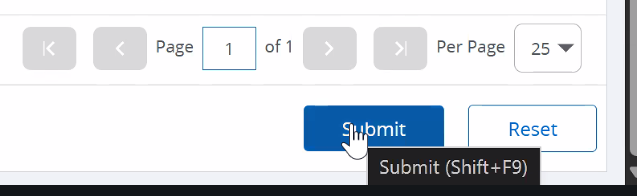
Scroll down and click confirm.
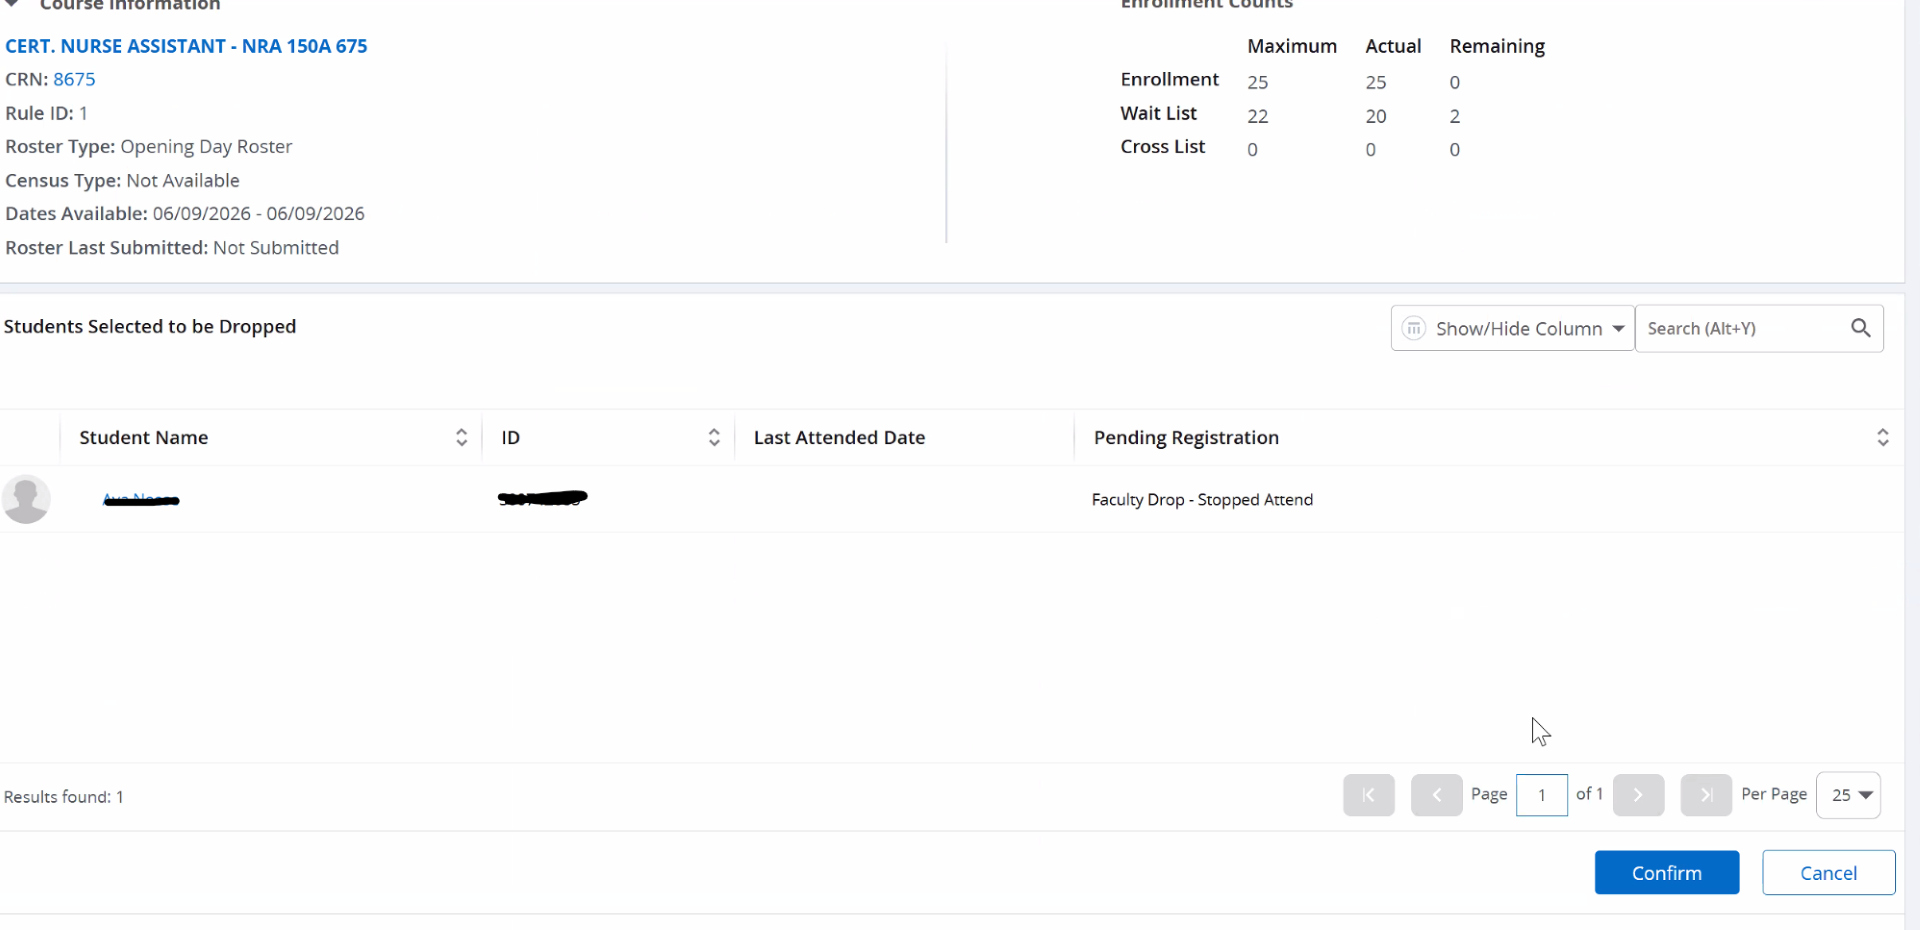
- How do I review census dates?
The Drop & Census Rosters allow you to review census dates and drop students from courses as needed. Select Drop & Census Rosters on the Faculty Self-Service landing page.
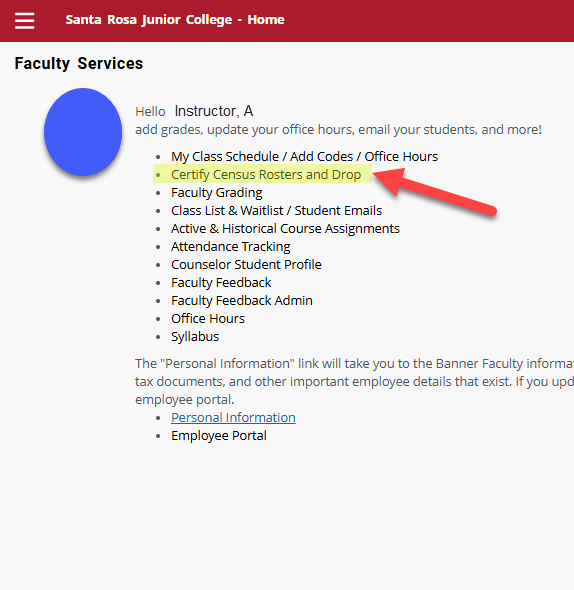
Then, select the term and the menu item you’d like to view. "Current Drop Roster Summary" will show you your Census Rosters for the most recent term.
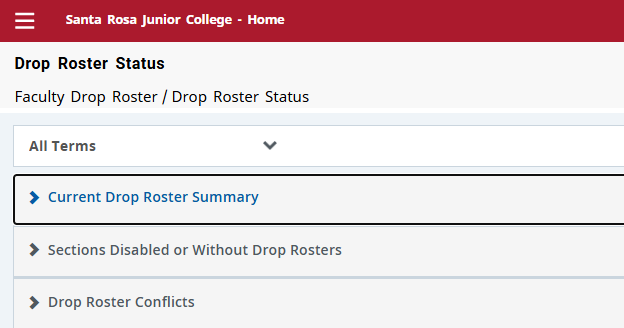
The census date will be listed for the course along with the status of the census.

- How do I certify my roster? (How do I complete my census?)
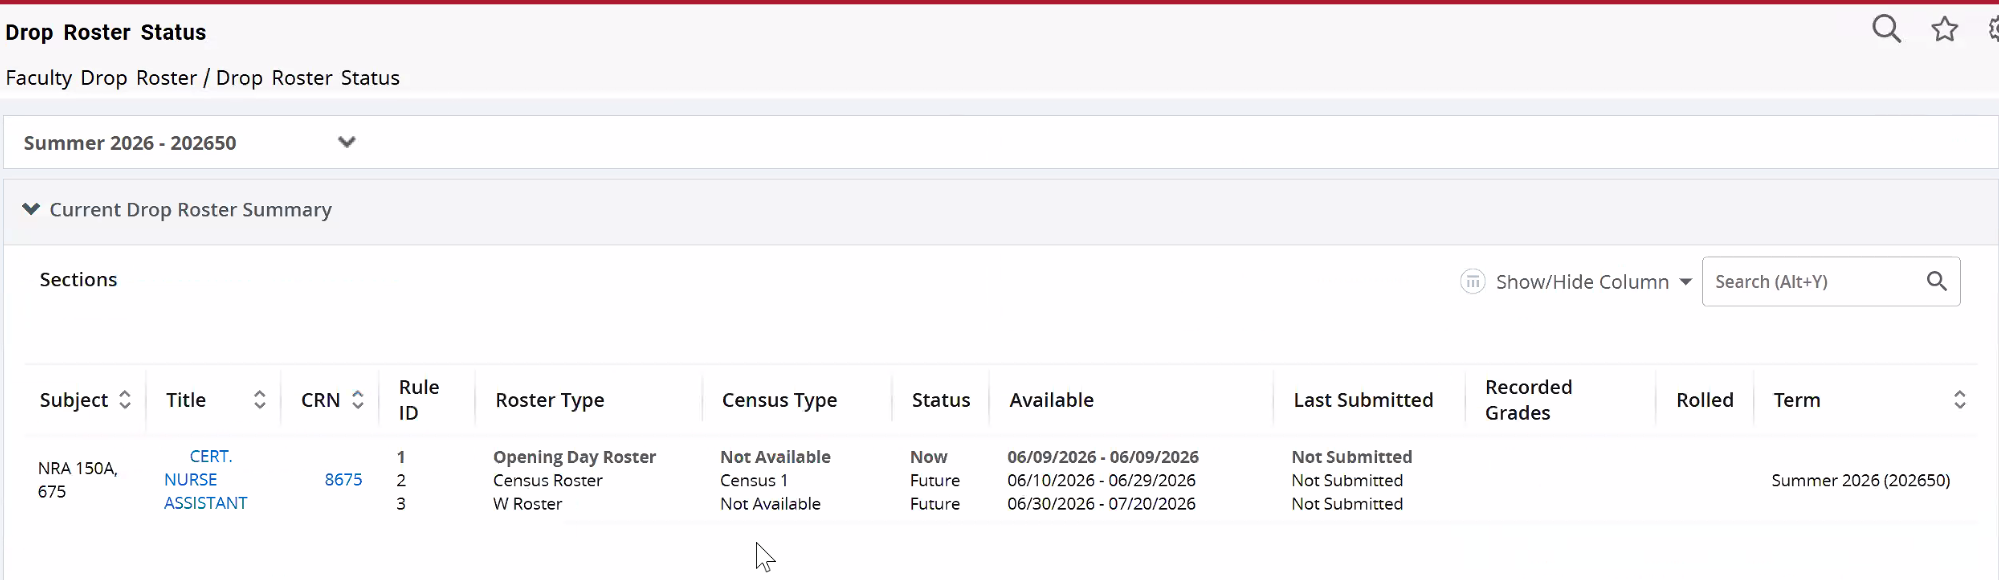
Certifying your roster means reviewing your class list at each required checkpoint, dropping any students who qualify for that checkpoint, and submitting the roster. There are three separate rosters you'll need to certify during the term, each with its own deadline and purpose.
Certification is required for all three rosters:
Roster
Purpose Opening Day Roster Drop students who never attended (no-shows). Census Roster Drop students who stopped attending/participating during this timeframe. These drops do not receive a W and are not eligible for a refund. W Roster Drop students who stopped attending/participating during this timeframe. These drops do receive a W and are not eligible for a refund. Example in Faculty Portal (every CRN is different):
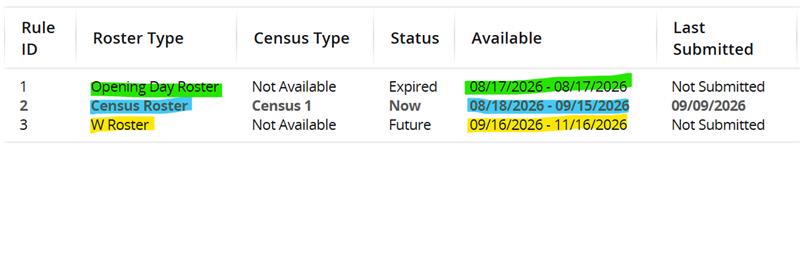
A few important things to know
- If your class is Positive Attendance (Non-credit) then you do not need to certify your roster.
- Each roster has its own deadline, shown in the Status/Availability column. Once a deadline passes, that roster closes and can't be certified after the fact.
- Certifying confirms your official enrollment numbers and allows other students to enroll in the class (where applicable).
- If you do not certify by the deadline, you may not be able to complete your final grades.
- Accurate enrollment numbers matter for the college and can affect things like financial aid eligibility and athletic participation.
- If you need to change a course from Positive Attendance to Census, contact your Department Chair. They will work with the Scheduling Office to make the change.
How to certify a roster
- From the Faculty Dashboard, select Drop & Census Rosters.
- Find the class you want to certify. Click either the subject name in the first column or the dates in the Availability column to open that class's roster for the roster you're working on (Opening Day, Census, or W). The Status/Availability column shows the deadline for that roster.
- For any student who qualifies for a drop under that roster's criteria (see table above), use the action dropdown to mark them to be dropped.
- Scroll down and click Submit. If your list has more than one page, check each page before submitting.
- The next screen confirms how many students will be dropped. Scroll down and click Confirm. This one action drops the students and certifies the roster, they happen together.
- Once confirmed, the button changes to Back to Maintenance. Click it to return to the Drop Roster Status page, where your class will now show the date you completed that roster.
Nobody to drop? Leave the list as-is and click Submit, then Confirm. This still certifies the roster and confirms everyone shown is accurately enrolled.
If you miss a deadline
If you miss the deadline to drop a student on any of these rosters, email registrar@santarosa.edu with:
- The student's full name
- Student ID number
- Section number
- Last date of attendance, or confirmation that the student did not participate
The Admissions and Records Office can then assist with processing the drop.
After census, a student must petition online to request to add late for each class. This form goes through A&R who sends it to the faculty for approval. If approved, we will register the student.
- Will I be able to submit my final grades if I did not certify my rosters?
Yes. If you had no students who needed to be dropped from either roster, you can still submit your final grades.
If you should have dropped a student from an Open-Day, Census Roster, or Drop with W roster, you will need to enter a final grade for that student: A, B, C, D, F, P, NP, or SP.
If you enter a non-passing grade, you must also enter the student’s last date of attendance.
If you do not enter grades for students who should have been dropped, your final grade status will remain yellow “In-Progress” instead of changing to green “Complete.” This will mean your Dean and Department Chair will continue reaching out to you until you submit all grades.
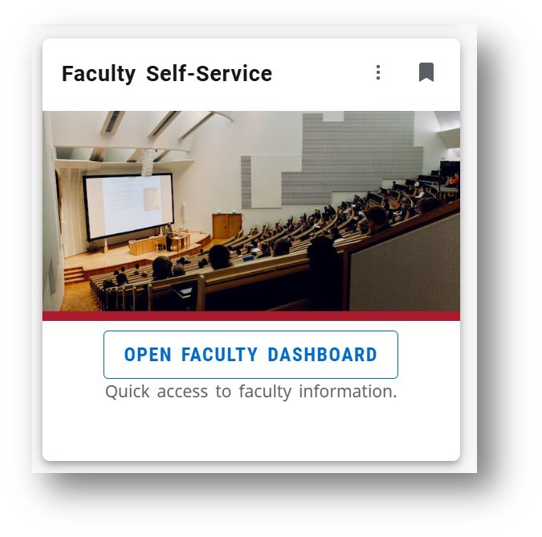
- Where do I access my faculty tools?
Locate the Faculty Self-Service card and select “Open Faculty Dashboard.”
- Can I cross-list my courses in Banner/Bear Cub Hub?
Because Bear Cub Hub does not have a cross-listing tool, faculty will now cross-list their courses using the native Canvas tool. This tool will be available 2 weeks before the first day of each semester through the end of the first week of the regular semester. For Fall 26, this window will be August 3-21. Since cross-listing erases the "child" course, this limited window of availability is designed to reduce accidental loss of student grades and work.
If you are planning to cross-list your Canvas courses and would like to begin working on your course content now, select one course shell to serve as the "parent" shell and develop your content there. When the cross-listing tool becomes available on August 3rd, follow the instructions and guidance provided on the DE Cross-listing page.
- How do I access my student's Disability Resources Department accomodation letters and sign them?
The Disability Resources Department has transitioned to Accommodate, our new disability accommodation management system, which can be accessed via the Bear Cub Hub.
Through Accommodate, you will be able to:
- View accommodation letters for students enrolled in your courses.
- Review each student’s approved accommodations.
- Acknowledge receipt of accommodation letters.
- Return to accommodation information throughout the semester as needed.
To access the Accommodate Faculty Portal in Bear Cub Hub:
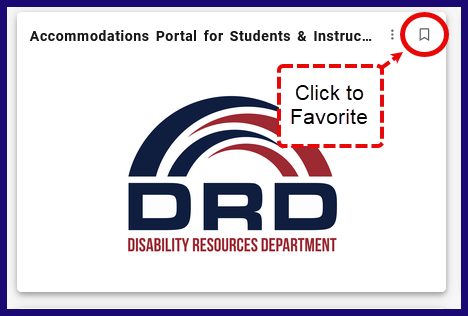
- Click “View All Cards” in the upper-left corner of the Bear Cub home page.
- Locate the DRD card.
- Click the favorite button in the top-right of the card. Now the card will always appear on your homepage.
- Click on the DRD card. A new window will open.
- Select Faculty.
- Click on Accommodation Letters in the right-side menu to view them.
Please remember that accommodations become active after the student provides their accommodation letter. Students are also encouraged to communicate with their instructors about how their accommodations will be implemented in each course.
Faculty Review and Acknowledgment of Accommodation Letters
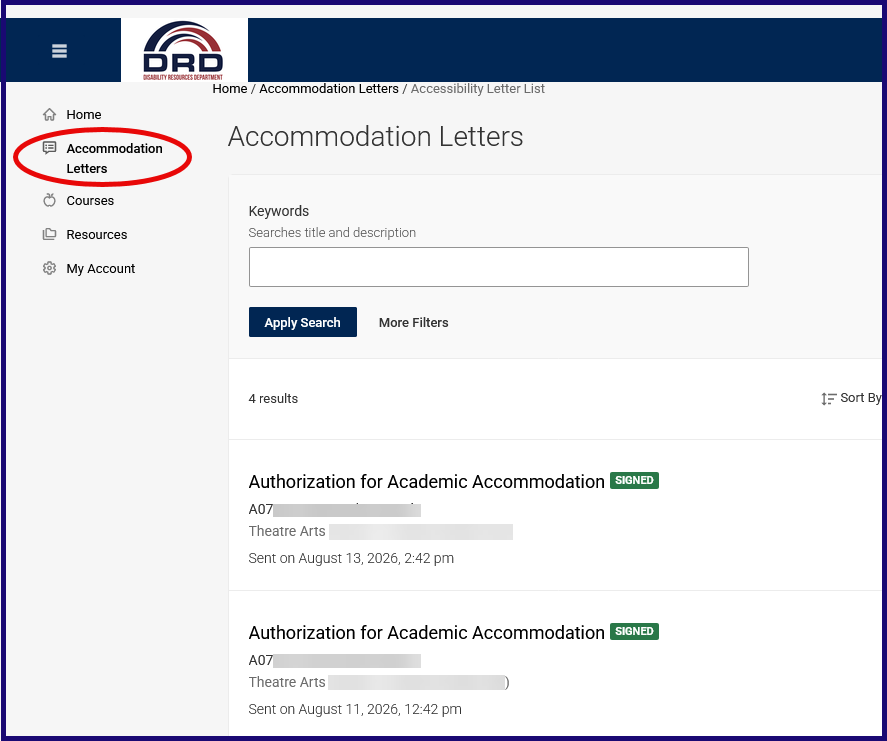
Faculty need to review and acknowledge each accommodation letter. Complete the following steps:
- Click on the letter you would like to review. You will be able to see:
- The letter subject
- The accommodation letter
- The date and time the letter was sent
- Below the accommodation letter, you will find the Faculty Acknowledgment section.
- After reviewing the accommodation letter, complete the required acknowledgment information.
- Your acknowledgment is automatically saved, and the form becomes read-only. You may then close the window or continue reviewing additional accommodation letters using the Previous and Next buttons.
When you return to the Faculty Home page, accommodation letters that have not yet been reviewed will continue to display the Review button. Those that have been acknowledged will be marked Signed.
All accommodation letters—including those that have already been acknowledged—remain available throughout the semester.
To view previously signed letters, navigate to the Accommodation Letters section within the old Faculty Portal.
Please contact DRD when you have questions regarding:
- Accessing or interpreting an accommodation letter.
- Implementing an approved accommodation.
- Accommodated testing.
- Assistive technology or alternative media.
- Accessibility concerns.
- Will I be able to submit my final grades if I did not certify my rosters?
Yes. If you had no students who needed to be dropped from either roster, you can still submit your final grades.
If you should have dropped a student from an Open-Day, Census Roster, or Drop with W roster, you will need to enter a final grade for that student: A, B, C, D, F, P, NP, or SP.
If you enter a non-passing grade, you must also enter the student’s last date of attendance.
If you do not enter grades for students who should have been dropped, your final grade status will remain yellow “In-Progress” instead of changing to green “Complete.” This will mean your Dean and Department Chair will continue reaching out to you until you submit all grades.- How do I submit grades?
The new system for submitting grades will look and feel different than the previous version, and certain pieces of information not required previously are now required. The instructions below cover submitting final grades. See the How do I submit an Incomplete?, Positive Attendance Hours, and Grade Processing, Grade Changes and Late Grade Submission for those specific topics.
Some items to note about the new system and grade entry:
Mid-term Grades: In Bear Cub Hub, you will see columns and tabs for Midterm grades. Midterm grades cannot be entered using the Bear Cub Hub. However, midterm grades used for the evaluation of student progress shall be issued in accordance with regulations established by the faculty and the District. Instructors shall notify students at mid-semester regarding their progress toward successful completion of the course objectives.
Importing Grades from Canvas: To import grades from Canvas, use the Canvas Grade Submission Tool.
Needing to Drop Students: The Last Day to Drop with a W date on your section's Important Dates area is the deadline to drop students. If a student needs to be dropped after this deadline has passed, send an email to registrar@santarosa.edu.
Submitting Grades on Behalf of the Primary Instructor: If you are not the primary instructor listed when the Scheduling Office created your class, then you will only be able to read rosters. If you need to be designated as the primary instructor, contact your department chair who will then contact the Scheduling Office.
Also, a helpful resource: SRJC's Grading Policy.
Step 1
Locate the Faculty Self-Service card and click on Open Faculty Dashboard.
Select Faculty Grading from your Faculty Self-Service area.
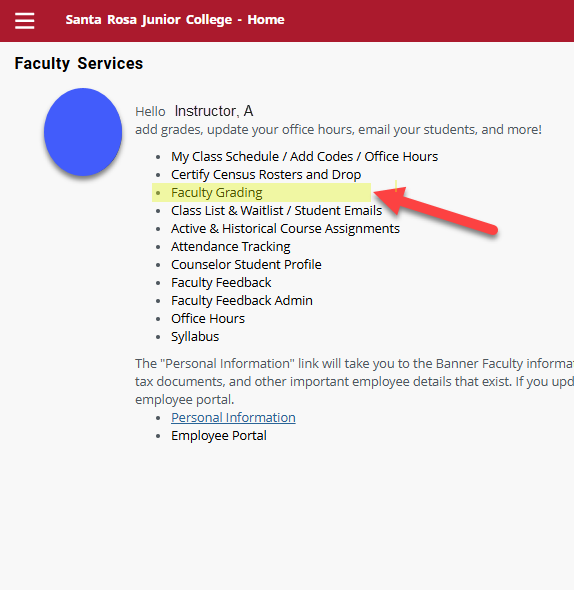 This will take you to My Courses. Click on the white space for the row of the course you wish to submit grades for.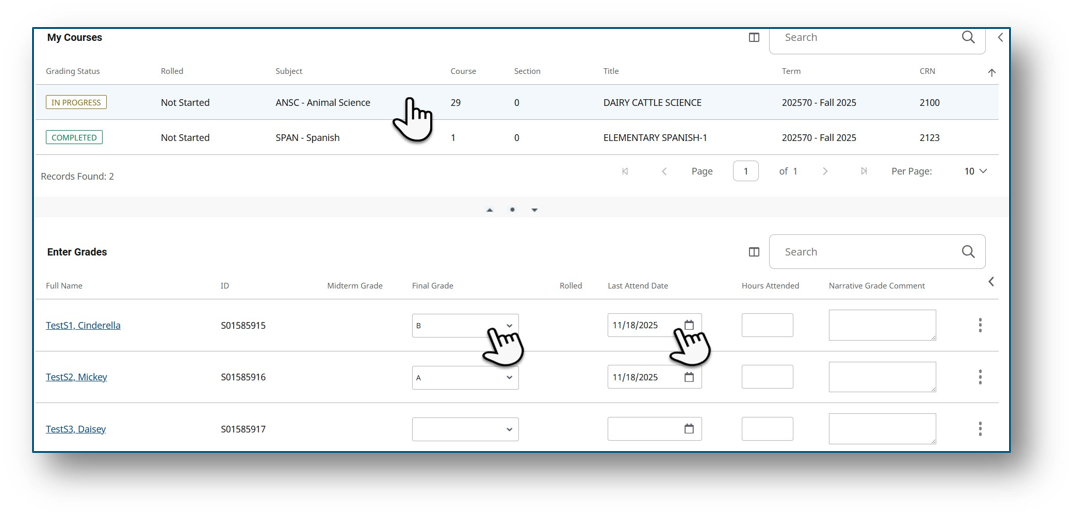
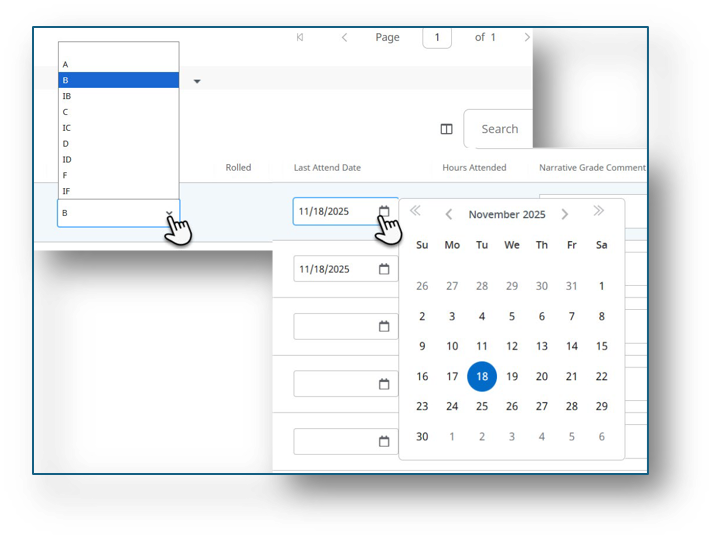
You will see a column with the student's names, their ID, and then a variety of new fields and column titles. Please take a moment to review the new terminology and processes below:
- Midterm Grade: This is currently non-functional in Bear Cub Hub.
- Final Grade: Select the student's final grade from this drop-down menu. Incomplete options are IB, IC, ID, etc. Follow the instructions in How do I submit an Incomplete? to learn more about these options.
- Rolled: This column will populate once the final grades have been processed. This is the indication that your students can now view their final grades in Bear Cub Hub.
- Last Attended Date: You only need to select a date here if you are assigning a student a non-passing grade (a D, F, NP, NC).
- Hours Attended: This area is only required if you are teaching a Positive Attendance Hours course. If this applies to you, submit the hours here.
- Narrative Grade Comment: This area is only relevant for Incompletes. This is where you provide notes on the required work the student must complete. If you are not submitting an Incomplete, you do not need to fill out this field.
- Not Gradeable: You may see this for some students in the Midterm and Final Grade columns. This means that this student has dropped or been dropped. You need to submit a Last Attended Date for these students if you did not already do so when you dropped them.
Step 2
Using the Final Grade dropdown menu, select the grade for each student. Select a Last Attended Date for any non-passing grades (D, F, NP, NC). Input the required details if you are assigning any Incompletes. Input the Hours Attended if you are teaching a positive attendance class.
Step 3
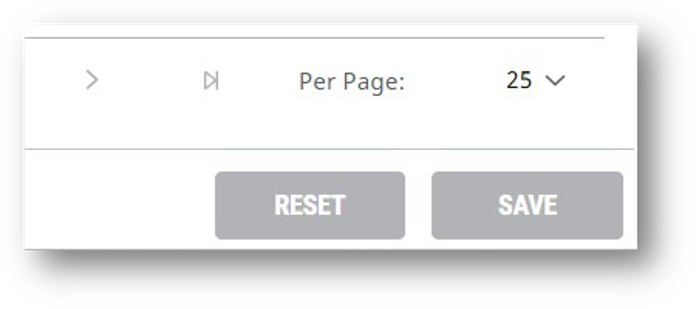
Click Save to save your current work. Once all grades have been entered, clicking Save will finalize the submissions. Clicking Reset will clear all entries for that class.
When can Students View their Final Grades in Bear Cub Hub?
Final grades are not viewable to students until after Admissions & Records has run final grade processing after the Submit Final Grades deadline listed in the Academic Calendar for the relevant semester. See Grade Processing, Grade Changes, and Late Grade Submission for more information.
Non-Passing Grades and Last Attended Date
Faculty are now asked to enter a Final Date of Attendance/Participation for all students receiving a non passing grade (D, F, NP (No Pass), NC (No Credit). Collecting this information serves several important purposes:
- It provides Admissions & Records with documentation when reviewing student petitions, grade appeals, or requests for grade review.
- It supports required reporting and compliance for Financial Aid by documenting the student's last date of academic participation.
- Entering and accurate final date of attendance/participation helps ensure students are reviewed fairly and that the District meets state and federal reporting requirements.
Grading Status:
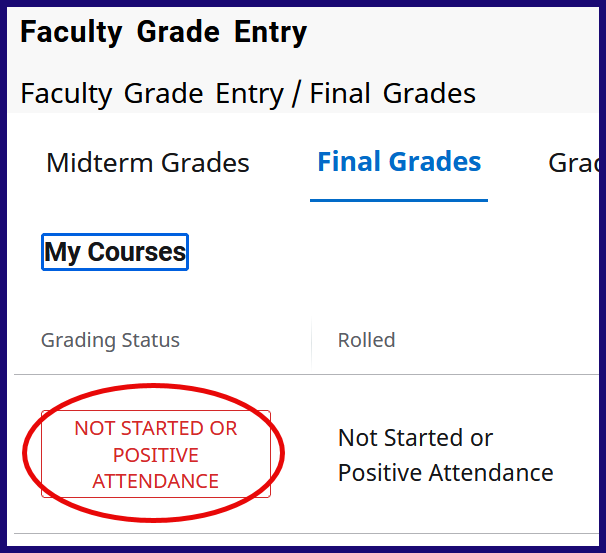
The Grading Status indicates the progress of your final grade submission, not the status of your duration of class. Here are the definitions of each status that you will see in the Grade Entry area:
- Not Started or Positive Attendance: You have not entered or submitted any final grades, or the class is designated Positive Attendance. See Positive Attendance Hours to learn how to submit positive attedance hours.
- In Progress: You have started entering grades, but one or more required grade fields are still incomplete, so the submission has not been finalized.
- Complete: You have successfully entered and submitted all final grades.
If you believe there is an issue with the way your class is setup (dates, times, hours, enrollment capacity, grade mode, etc.), contact your department chair who will then contact The Scheduling Office to make the corrections if needed.
For any questions regarding final grades or incompletes, contact Michelle Parrish with Admissions and Records: mparrish@santarosa.edu.
- How do I import my grades from Canvas into Bear Cub Hub?
To import grades from Canvas, you use the Canvas Grade Submission Tool.
The Canvas Grade Submission Tool pulls final grades from a Canvas course's Grades page (or 'Gradebook'), and submits them to the Grade Entry area for the course in Bear Cub Hub's Faculty Dashboard. With the transition to Bear Cub Hub and Banner, this replaces the prior tool from Faculty Portal, which allowed grades to be uploaded from a Canvas course.
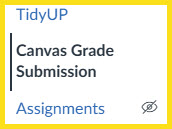
To learn how to use the tool, please visit the Canvas Grade Submission Tool page on the DE website.
Also, a helpful resource: SRJC's Grading Policy.
- How do I submit an Incomplete?
You no longer need to submit a separate form for an Incomplete. When submitting incompletes for final grades, faculty can choose one of the incomplete grade options: IB, IC, ID, IF, IPP, or INP. These grade types are defined as:
- IB - Incomplete B
- IC - Incomplete C
- ID - Incomplete D
- IF - Incomplete F
- IPP - Incomplete Pass
- INP - Incomplete No Pass
The student has up to one year (or shorter period if agreed upon by the instructor and student) to complete the missing work. If the work is not completed by the deadline, the grade will automatically change the incomplete grade to the final letter grade associated with the "I".
For example: If the instructor submits an IB and the student does not complete the required work by the deadline, the grade will automatically change to a B.
If you select one of these grade types as you are submitting final grades, you will also be required to enter comments explaining what work the student still needs to complete in the Narrative Grade Comment area. Students will be able to see the comments you post about the incomplete on their "View Grades" page (but NOT on transcripts), including the default grade and the extension deadline.
If the student completes the required work before the deadline, the instructor must submit the electronic Grade Change Form through the Faculty Portal, just as they did in the old system.
Note: The student also has the option to submit a Petition to Drop due to medical reasons. If approved, they would receive and Excused Withdrawal (EW), which does not impact their GPA and they can take the course again at a later time.
For any questions regarding final grades or incompletes, contact Michelle Parrish with Admissions and Records: mparrish@santarosa.edu.
Also, a helpful resource: SRJC's Grading Policy.
- Grade Processing, Grade Changes, and Late Grade Submission
Grade Changes & Late Grades
You can change your final grades as many times as needed until the final grade deadline listed on the Academic Calendar. For Summer 2026, the deadline is Friday, August 14 at 11:59 p.m.
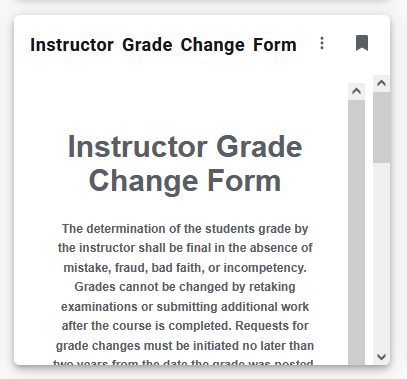
Any grade changes or late grades after that date will need to be submitted using the Grade Change Form in the Faculty Portal. The Grade Change Form is available as a card in the new Bear Cub Hub (see the picture below). We are using the card instead of a shareable link to help keep the form secure.
After you submit the form:
- You will receive a confirmation email.
- Admissions & Records will receive the request.
- The grade will generally be updated within 3–5 business days.
Grade Processing & Visibility to Students
Admissions & Records runs End of Semester Grade Processing after the deadline to submit grades listed in the Academic Calendar has passed. Again, in the case of Summer 26, this date is August 14th.
Once Admissions & Records completes End of Semester Grade Processing, students will be able to view their final grades through their student portal. At that point, you will no longer be able to make grade changes directly. For Summer 2026, we plan to post final grades by Monday morning, August 17.
If you have questions, contact Admissions & Records at registrar@santarosa.edu.
- How Do I Export a List of My Grades?
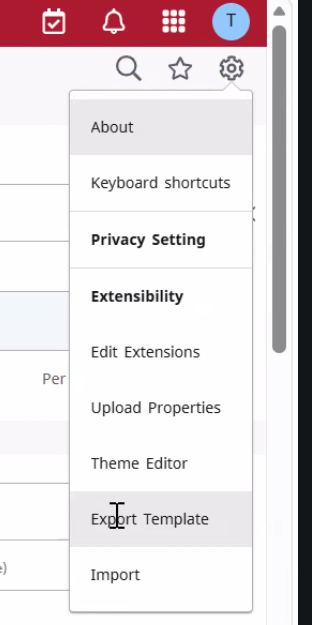
In Faculty Dashboard navigate to Faculty Grading. After you have entered grades for a class, you export a list of grades for the class by using the gear icon at the top right corner. Select the gear and then in the drop-down menu select Export Template.
This function generates an Excel file that includes; student names, ID numbers, grades, and last attended date (if entered while grading).
- Positive Attendance Hours
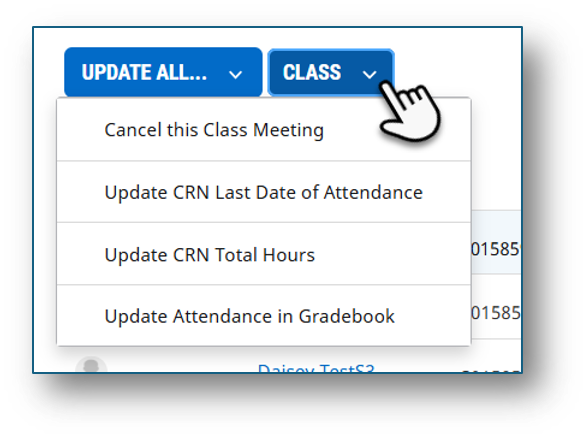
In Bear Cub Hub's Faculty Dashboard, if faculty use the Attendance Tracking feature for daily attendance, there is a single action they can take to push the accumulated hours directly to the grade roster. In Attendance Tracking, under the Class button, faculty can select "Update CRN Total Hours" to push the final hours to the grade roster:
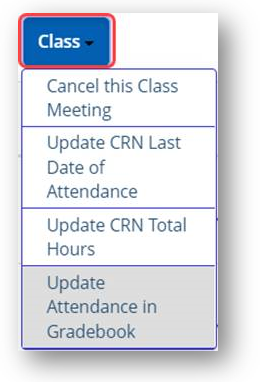
If the faculty is not using Attendance Tracking, and their course is a Positive Attendance, they will be required to provide the hours when posting the grade during final grading.
Positive Attendance Hour Calculations in Banner
Banner is basing its calculations on the contact hour vs. clock hour formula used by the CCCCO. Josh Adams created the spreadsheet below to help, and has also provided a link to the CCCCO guide to calculating contact hours. Legacy SIS scheduling included breaktimes, passing times, and partial clock hours - Banner does not.
For example: a simple 3.0 Unit lecture class that meets twice a week for an hour and half used to say 8:00 to 9:30 and would now show as 8:00 to 9:15 in Banner (this reflects exact 75-minute instructional sessions, based on the 10 minutes of passing time and a 50-minutte divisor for the partial clock hour).
Also, a helpful resource: SRJC's Grading Policy.
- Which classes need to take attendance?
Faculty are expected to keep accurate attendance records, but how attendance is tracked depends on the type of course.
- Census courses (credit courses): Faculty record attendance through the census date. Students who never attend or stop participating before census may be dropped. Attendance is also used for financial aid and reporting.
- Positive attendance courses (non-credit & open entry/exit credit courses): Faculty must record the actual hours each student attends every class. These hours are used to calculate state funding and must be accurate for audits.
- Online courses: Logging into the course is not considered attendance. Students must actively participate by submitting assignments, taking quizzes, posting in discussions, or completing other academically related activities.
IF YOU AREN'T SURE WHICH CATEGORY YOUR CLASS FALLS UNDER, contact your department chair.
Record keeping is an important faculty responsibility. It is required that accurate and complete student grade records be kept for a period of three years. Attendance records are only required for positive attendance classes. In these classes, attendance records should also be kept for three years.
Keeping attendance records is recommended for the following reasons:
- Attendance records are important if it becomes necessary to drop a student for non-attendance—in the event of an audit, faculty members must be able to provide the attendance records for each student dropped because of poor attendance.
- Faculty members must indicate the “last date of attendance” when issuing an unsatisfactory grade to students.
Keeping accurate attendance records is important because it supports:
- State funding
- Financial aid eligibility
- Veteran and international student reporting
- Student drops and withdrawals
- State audit requirements
In short, all faculty should keep accurate attendance records, but the method depends on whether the course is census, positive attendance, or online.
- Can I track attendance in Bear Cub Hub?
Yes. After clicking on the Faculty Self-Service Card, use “Attendance Tracking” to record attendance for your courses and update records as needed.
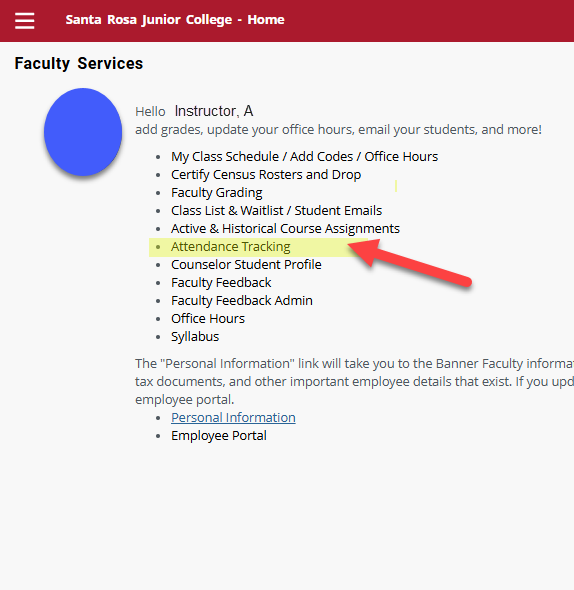
Attendance Tracking allows you to document attendance for each course. Select the Take Roll button to begin.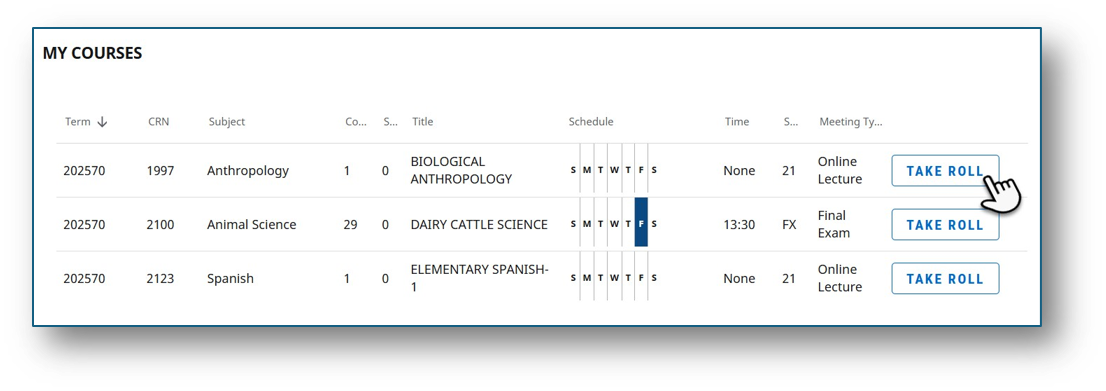 You can use the quick actions drop-down to take attendance for all your students at once or update individual students as needed.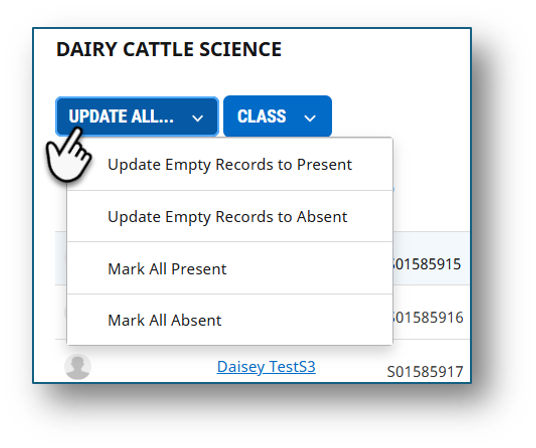
Use the quick actions drop-down to manage class information, such as cancelling a class meeting, entering total hours, or updating attendance in the gradebook.
 When marking all the students present, it will save automatically and appear like this: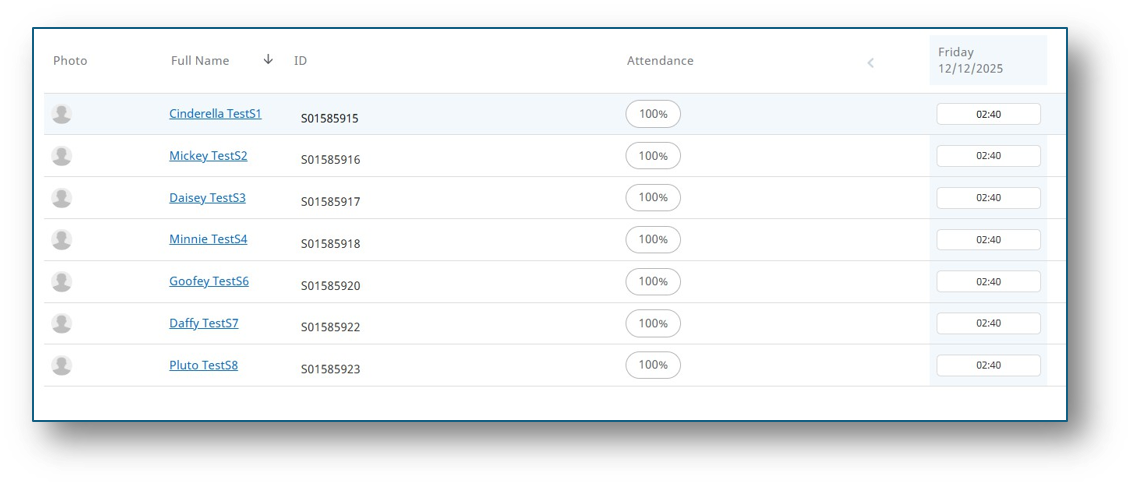
- Where do I manage my office hours?
After clicking on the Faculty Self-Service Card, select “My Class Schedule / Add Codes / Office Hours” from your dashboard to add, update, or remove office hour availability.
My Class Schedule/Add Codes/ Office Hours is where you configure the Office Hours you want to share with students.
This will eventually replace the Office Hours currently on the SRJC Website.
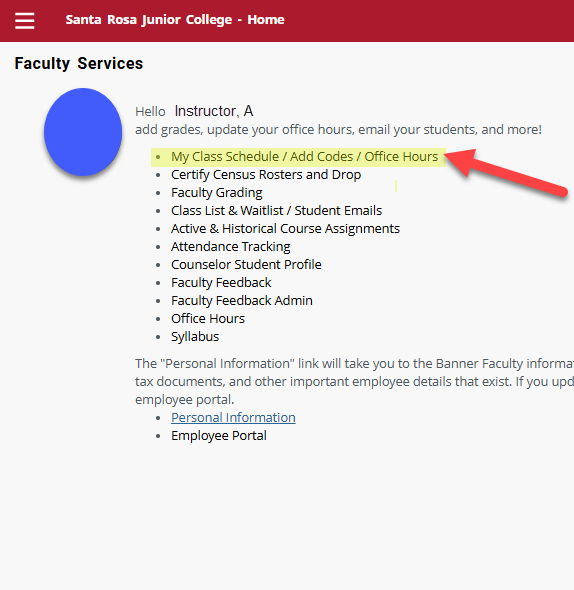
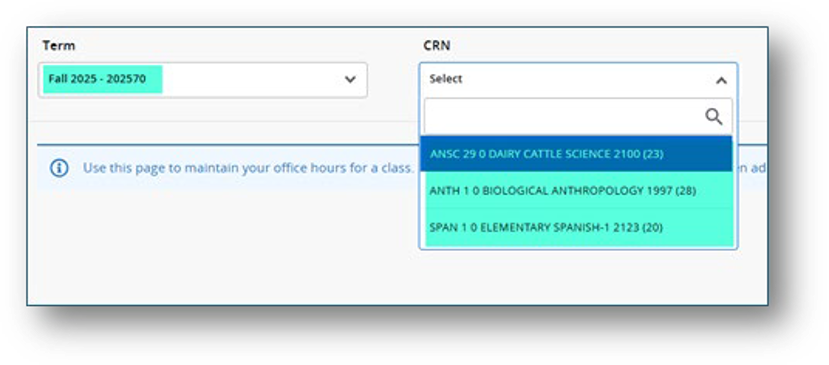
Select the term and course you would like to manage.
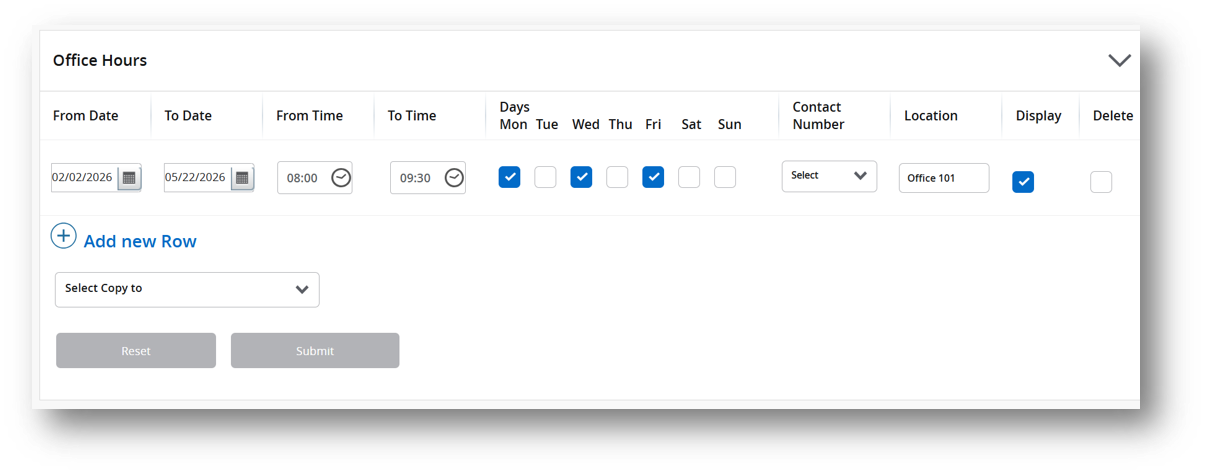
Scroll down to the Office Hours section.

Click on the blue "Add Office Hours" button to edit.
Using the areas in the screenshot below, you can display or delete the current office hour setup. Use the Add new row to add to or create a new row if none are already created. If you deselect the display, it will continue to appear on your dashboard for future use. You can always use an existing office hours row and copy it for a particular course; it will display for students when they register, waitlist, or are active students on their class list tied to your teaching courses.
- How do I use the Syllabus feature in Bear Cub Hub?
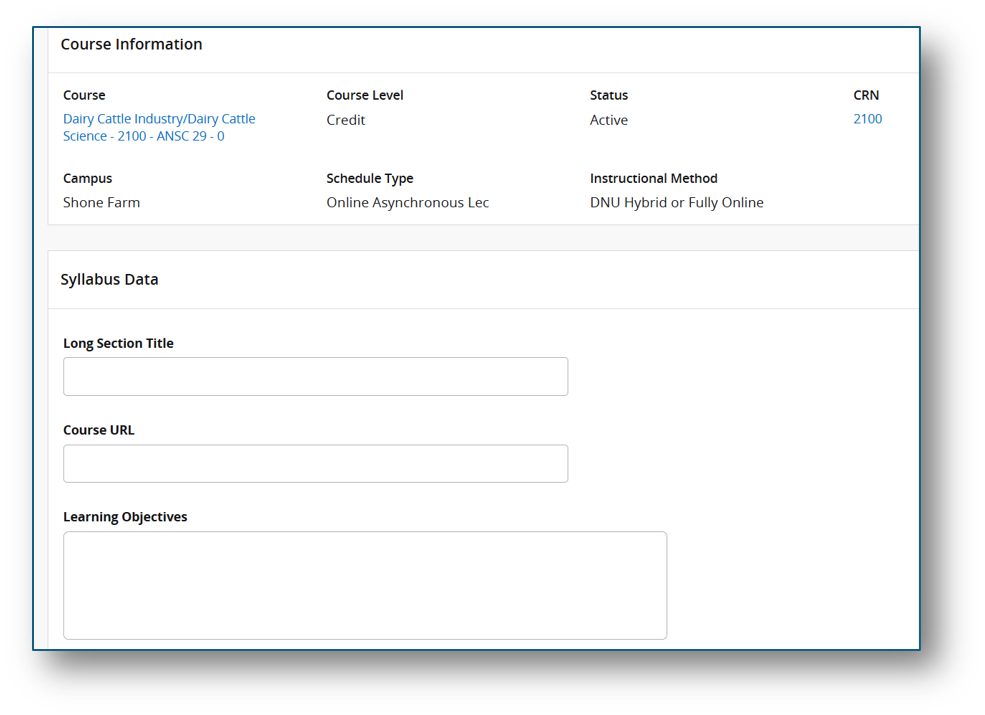
The syllabus posting tool in the Bear Cub Hub cannot be formatted or include live links, which makes viewing difficult for students. Because of these limitations, we suggest you put only essentail information into the Bear Cub Hub Syllabus area (such as textbook details), and consider sending the full syllabus via email as an attachment. Use the instructions below for either option:
To use the Bear Cub Hub Syllabus Tool
First, select the syllabus option from the Faculty Self-service landing page.
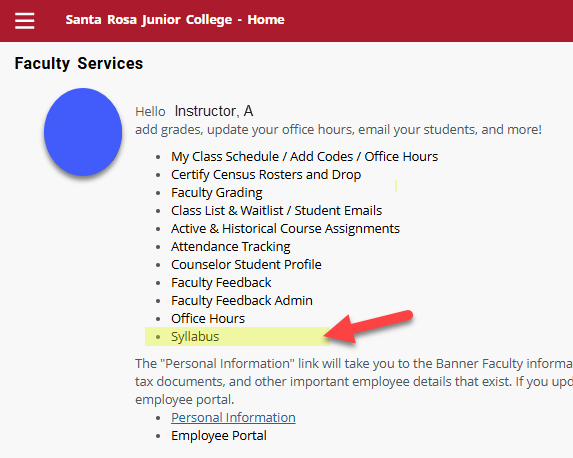
Next, you can select the term and CRN of the course you wish to add syllabus information to.
- Where can I see my teaching schedule?
After clicking on the Faculty Self-Service Card,, use “My Class Schedule/Add Codes/Office Hours” or “Active & Historical Course Assignments” to view course details and schedules.
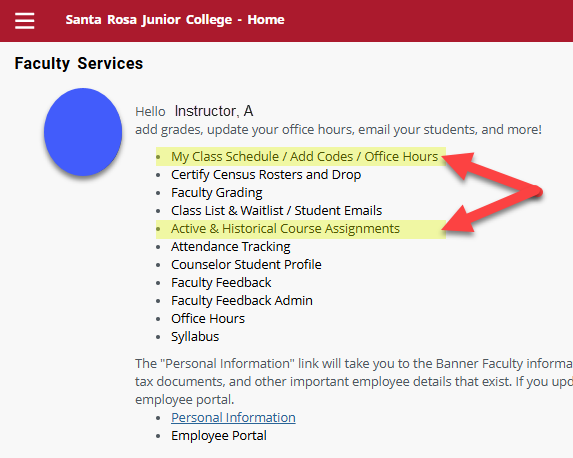
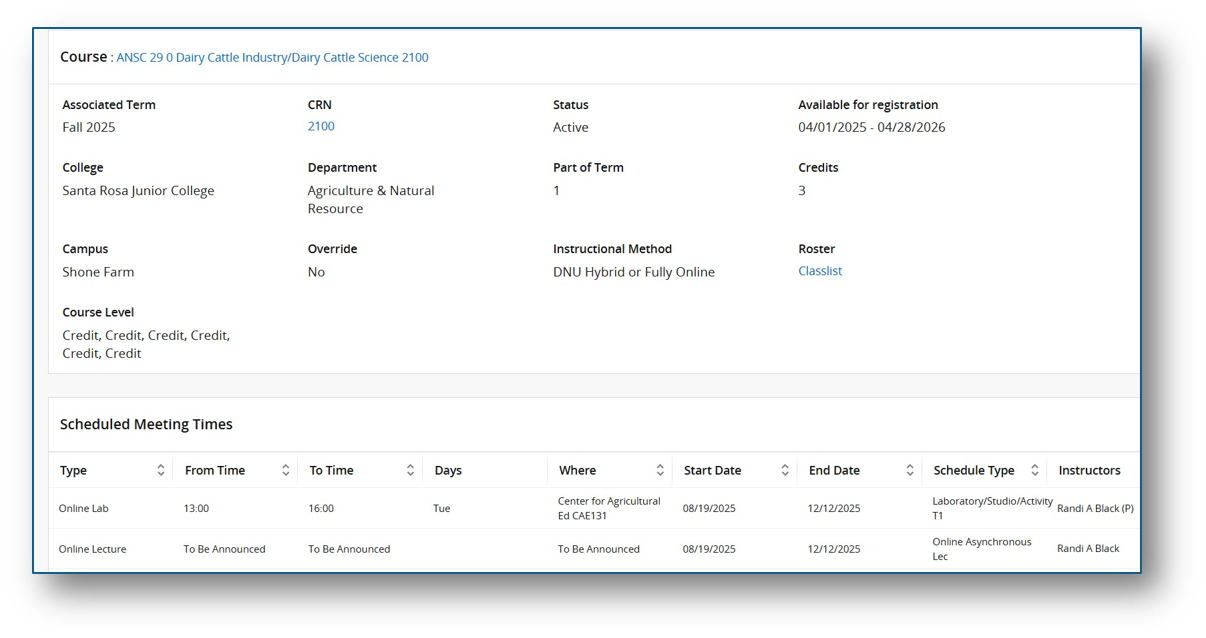
My Class Schedule/Add Codes/Office Hours
The My Class Schedule/Add Codes/Office Hours is another view of your assigned courses. This page provides course-level details, including the Department, Campus, etc.
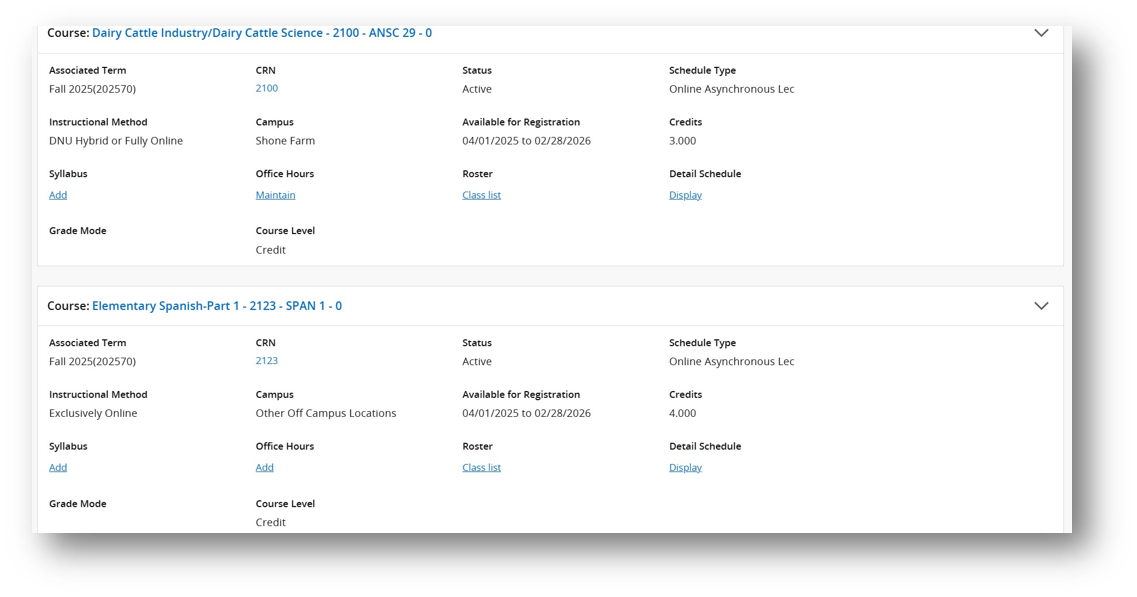
Active & Historical Course Assignments
The Active & Historical Course Assignments function provides a comprehensive view of your courses, showing office hours, syllabus information, class list, and schedule details in one place.
- Where can I track my Professional Development commitments? (Fall 2026)
Professional Development Reporting
For at least the coming year we will continue to use the legacy SIS faculty portal (aka “myCubby”) to report all our required professional development hours. To find the myCubby SIS portal from SRJC’s home page, use the drop down “login” menu to navigate to “Faculty Portal”.
Reporting PDA day participation
For all contract faculty who participated in the Fall 2026 PDA day, the link to report your hours is now live. Please note, the button for Fall 2026 is at the bottom of the list of semesters after you select “Professional Development Reporting.” To report your hours, click on “Report Professional Development” >> “PDA Day” >> Select a session that you attended from the dropdown list. Repeat with the other sessions until you have reported all the sessions you attended. If you were unable to attend, you must file an NOA for the hours you missed.Reporting Flex hours: All contract faculty owe 18 hours of flexible professional development hours throughout the course of the year. (For associates, your flexible obligation depends upon your assignment for the semester.) To report your flexible hours click on “Report Professional Development” >> “Forever Flex Options” >> Select the category that best represents the particular professional development activity you are reporting and report the activity in that category. We have recently updated the Forever Flex categories. Full descriptions can be found here. Please remember, if you are a contract faculty, 6 of your 18 hours must in some way focus on IDEAA (inclusion, diversity, equity, access, and anti-racism) proficiency.PDA Follow-up: We hope you all had a fruitful and fun Professional Development day. We have a few follow-up reminders.PDA Day survey: If you haven’t yet filled out the PDA survey, please do! Your feedback is factored in as the District’s PD committee plans future PDA days.Making PDA materials available to the community: If you presented a workshop and you want to share related materials to those who attended and the wider public, please submit these materials to Natalie Bertoli (nbertoli@santarosa.edu), cc’d to Brenda Dixon and Sussanah Sydney (bdixon@santarosa.edu, ssydney@santarosa.edu).For zoom recordings: Please upload the recording to a video host like YouTube or 3C Media Solutions, and then send the public-facing link.For handouts or slide decks: Please provide these in PDF format.Accessing PDA recordings and materials: Any PDA day recordings, slide decks, or electronic copies of handouts provided to the PDA day team will be posted in the PDA day schedule retroactively, accompanying the description of the session, which is still accessible at this link: SRJC, 2026 Fall PDA Day Schedule.- Can I update my personal information?
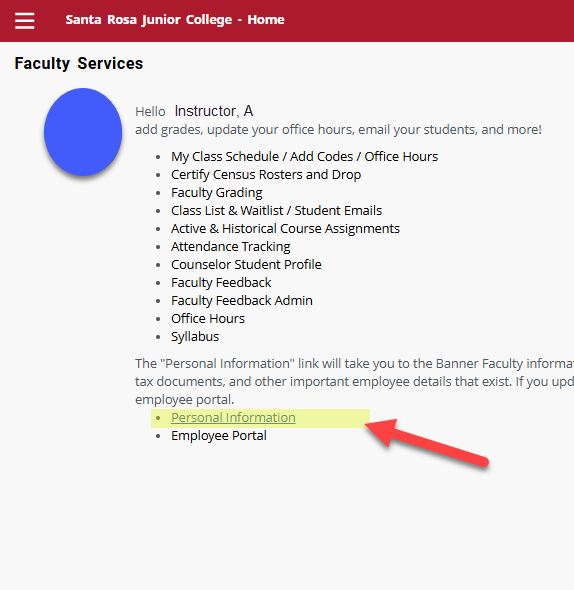
Yes. After clicking on the Faculty Self-Service Card, use the “Personal Information” section to update details like your preferred name and pronouns.
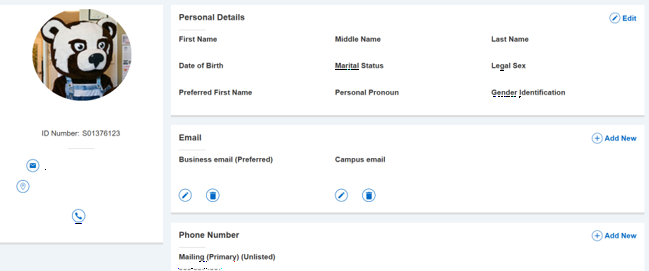
Personal Information displays what is stored in Banner related to your demographic information.
- How do I submit a field trip request?
Faculty members should submit all field trip requests using the Field Trip/Activity Request Form.
You can download this form and access other related materials, such as the Field Trip/Activity Liability Waiver, directly on the Student Life Forms Page.
For specific guidance or questions about field trip submissions, please contact your department Dean.